Building Your Outdoor Kitchen

Outdoor Kitchen Design: Process & Planning

Werever’s ultimate goal is to turn your dream outdoor kitchen into reality.


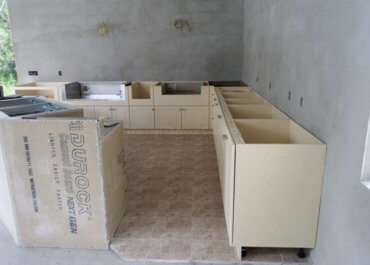
Choosing who to trust with your outdoor kitchen project can be a challenging task. We recommend that you do your research and weigh the cost as well as level of service for several different companies. There’s no question, though, that we’re the industry leader in customizable outdoor cabinetry (you can forget buying those inferior, pre-fit cabinets). 

With almost 20 years of experience, we not only have a product that will last you a lifetime (backed by warranty), we also have the expertise to guide you through the process from idea to finished product. The best part about choosing our service, is that once we’ve finalized the design, you’ll know exactly what your project will look like, what it will cost, and when it will be shipped to your door.

Either way, you’ll have plenty of time to plan your DIY process or hire a contractor. If you were to begin the process today, you could have your outdoor kitchen completely finished in as little as 4 to 6 weeks. And while every project differs, the great thing about Werever outdoor kitchen cabinets, is that the timeframe from beginning to end is largely up to you.

Cabinet Design Phase

“A goal without a plan is just a wish.”― Antoine de Saint-Exupéry

Consider Your Outdoor Space and Who You’ll Be Entertaining

The design phase of an outdoor kitchen project is how Werever translates your idea into reality. This is your opportunity to dream big. And because this is your dream, we need as many details as you can muster so that we can envision it in the same way. That begins with the idea/design process. During this process, you share with us what you’re hoping for, what the space is like where you’ll be building your kitchen, what layout you have in mind, and what your budget is.

When you’re imagining how you’d like your outdoor kitchen to look and what your hopes are for the final design, consider these things:

  • What kind of entertaining will you be doing? (grilling, bartending, woodfiring pizza, eating at the bar or at an outdoor dining table, etc.)

  • What is the largest number of people you’re planning to entertain?

  • Do you plan to cook often? 

  • What kind of cooking appliances do you plan to use?

Show Us What Your Outdoor Space is Like

It helps us to know how much space you’re working with and what that space looks like, so that we can offer you options that fit your ideas, as well as suggest options that we’ve seen work for similar spaces. Providing us with as many details as possible, will give you the best finished product. Here are some details that will help us accomplish that:

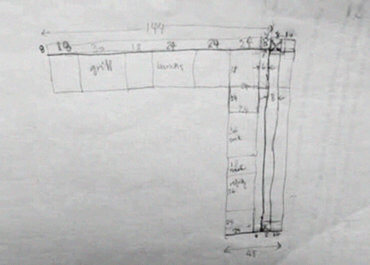
  • Pictures of your yard/space

  • Dimensions of the space where the kitchen/cabinets will be built

  • Blueprints (these are especially helpful if you’re planning your outdoor kitchen before the house has been built)

  • Hand-drawn sketches (we don’t expect the drawing to be perfect or for you to be Michelangelo)

  • Include in the sketch/blueprint where you want the appliances/electrical outlets to be placed

Don’t feel intimidated during this process. We don’t expect you to be an architect or a designer. In fact, most of our customers are NOT architects or even builders. We certainly welcome people in the construction trade, but we mostly deal with homeowners that don’t have construction experience. Our outdoor kitchen cabinets are custom-made, but are designed to be assembled DIY. 

So no matter what skill level you have (novice or expert), you can choose who you want to install them (yourself or a contractor). However, if you’re leaning more toward YDI (You Do It) from beginning to end, we’re more than happy to create your design based on your project goals and your budget. 

Create a Budget

In fact, your budget is one of the most important aspects of the planning process. We want your dream outdoor kitchen to match the funds you’ve allocated for the project. We respect your spending plan and have an array of options at varying price points. 

Once you’ve shared your project goals, we’ll begin working on a design that fits your space and your budget. If we feel that your budget is unrealistic, we’ll show you why with a design and a quote to explain it. If we can come in under budget, we’ll absolutely do it! Our goal is to give you an outdoor kitchen that has tremendous value, not just charge you an exorbitant amount of money. 

Our designers aim to provide a design with 3D renderings and an itemized quote on the next business day. The initial design is built custom for you. These are not copies of prior projects or canned designs from a library. It’s a curated design that you’ll get quickly, for FREE.

Verify Local Building Requirements and Secure Permits

Permitting requirements for outdoor kitchens vary dramatically across different municipalities throughout the country. Since outdoor kitchens are a relatively new feature in homes, some areas don’t have any specific codes that apply to outdoor kitchens at all. 

Some municipalities have adopted very strict requirements. If you are hiring a general contractor to assist with your project, they can certainly facilitate the permitting process if it is applicable. If you are doing the work as a DIY project, you can actually pull your own permits for your own house in most municipalities. 

You can call your local building department and simply ask them what permitting requirements or restrictions you should be aware of for outdoor kitchens in your town. Most areas don’t have specific requirements for the actual outdoor kitchen cabinet installation. 

If you are running electrical wiring and plumbing through your back yard to feed the outdoor kitchen, those items may require permitting. If you learn about any unique or strange permitting items, certainly coordinate these items with your Werever designer.

Finalize Your Design

Once we’ve created a design and your dream kitchen is no longer an idea, you can decide what changes (if any) need to be made. This is often the part of the process when customers realize whether or not what they’ve envisioned is actually feasible for their space (including considerations for local building requirements) and cost effective for their budget. And we welcome changes, as many as it takes to achieve a design that suits you. 

Our outdoor kitchen cabinets last a lifetime, so we want to make sure you’re happy with them for that long! Typically, the design process is finalized within a couple days and you’ll have a design plan that remains the same whether you’re ready the same day or years later; which is sometimes the case.

Our customers’ needs vary from a single project that they would like to begin immediately, to larger projects that the kitchen cabinets are a part of. Larger projects include plans for a deck, a pool, pavers, a house remodel, or even a custom new home. Either way, having a solid design in-hand will let you drive other parts of your project to completion.

Cabinet Installation Phase

“Starting strong is good. Finishing strong is epic.” — Robin Sharma

Whether this is your first outdoor installation and you’ve decided to hire contractors or you’re a DIYer, expect that you’ll have a successful project. We pride ourselves on the level of support we provide for our customers.

We are here to answer questions from the very beginning of the project (before your design has been rendered) until your project is complete. 

Plus, the cabinets are installed with common tools and there is minimal carpentry required. For most kitchens, the only items you’ll cut are a few fillers (if needed) and toe-kick panels. Because outdoor spaces are sloped for drainage, it’s impossible to cut the toe-kick at the factory to match the slope of your surface. 

The nice thing about this kind of carpentry is that it doesn’t require a lot of experience, and if you happen to make a mistake, you can easily order replacement fillers or fresh toe kick pieces. That shouldn’t be necessary, but we will always expedite any parts you need to complete your project.

Countertop, Appliance, and Fixture Installation

Once your outdoor kitchen cabinets are installed, all that’s left is to add all of the amenities you chose while waiting for your cabinets to be shipped. Before you begin that step though, have an electrician finish any necessary wiring.  Generally speaking, electrical work is done before countertops are installed.

If you’re having outlets installed in your backsplash, certainly coordinate these items with your countertop fabricator. Once the wiring is complete, have your countertops placed. Then set all of your appliances and fixtures. If you chose a gas grill, hire a licensed gas installer who can connect gas lines in accordance with local building rules.

Appliance & Fixture Phase

“Meticulous planning will enable everything a man does to appear spontaneous.” — Mark Caine

After you have submitted your signed drawings as confirmation of your selection, along with your payment, the fun part begins. Now that you know how your outdoor kitchen cabinets will look, you can choose which countertops, appliances, lighting, and other accessories will suit your style and needs.

Countertops

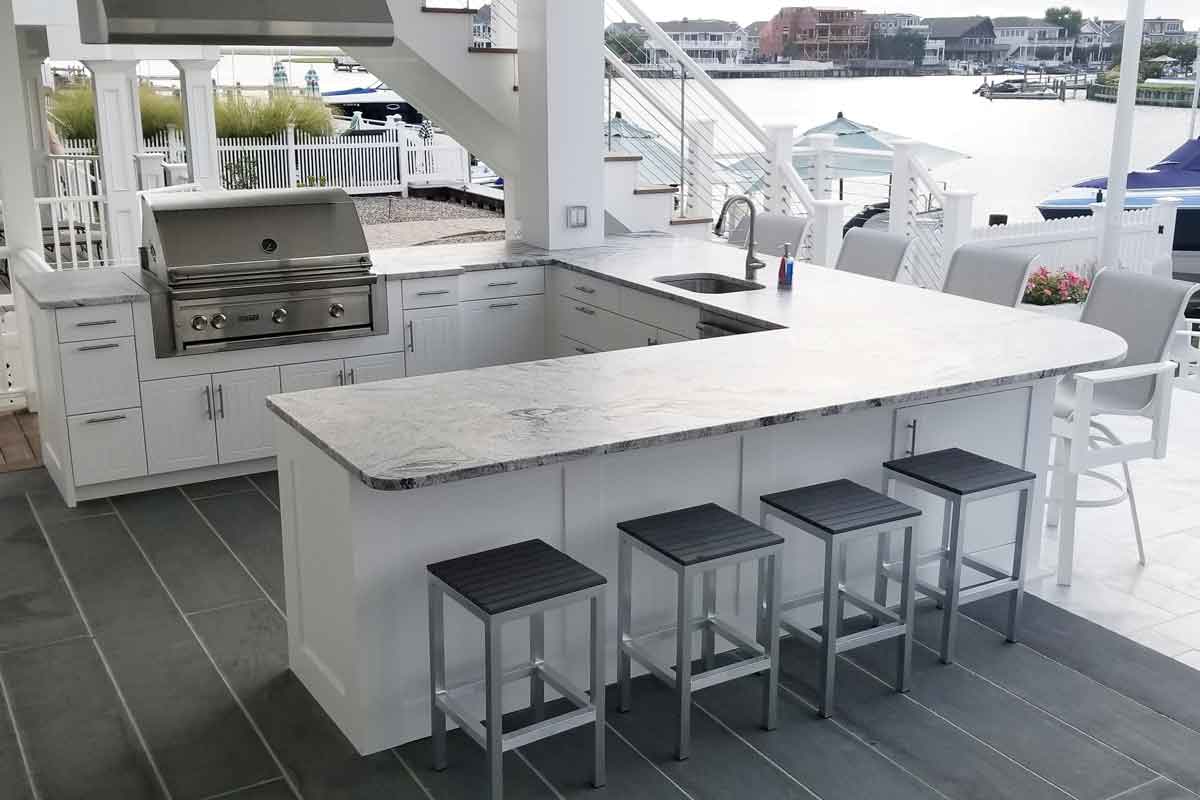
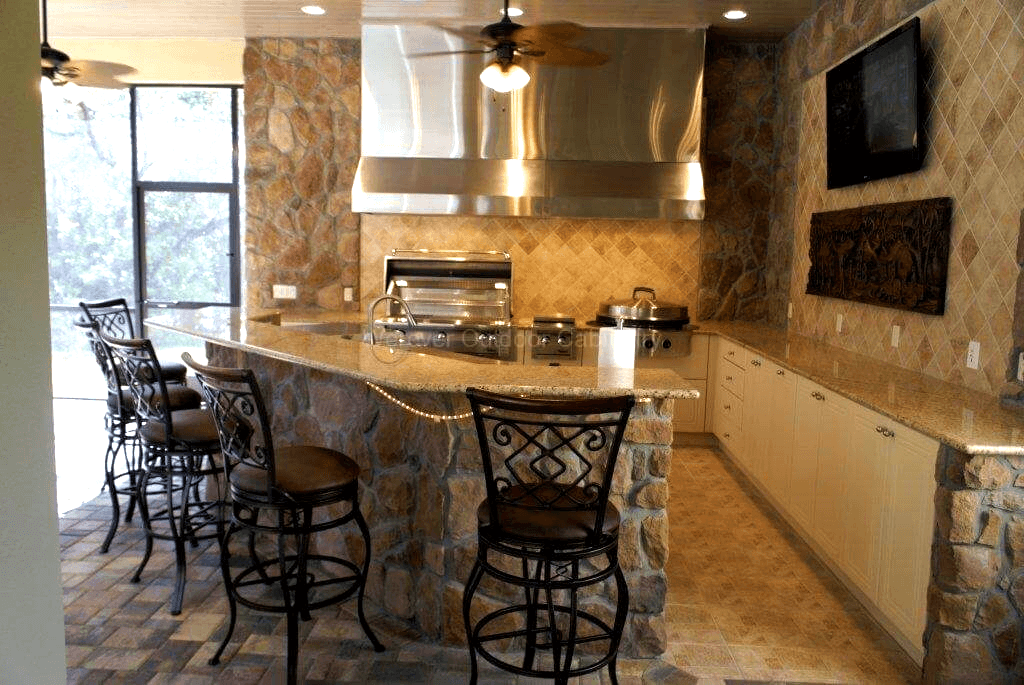
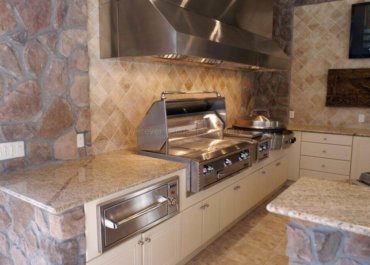
There are several material options to choose from for your outdoor kitchen, but make sure that the type of countertop you purchase can withstand all weather conditions and won’t change color over time.


We don’t recommend
a tile top built on plywood. That’s a popular DIY option, but it’s not nearly as durable as some other materials. It’s popular to use plywood as a substrate for tile, but far more effective to choose a waterproof board.

Your best option is to take your design to a local countertop company. A countertop professional can make recommendations and give you an accurate quote based on your vision.

Listed below are a few of the most popular countertop materials featured in outdoor kitchens, along with their benefits, drawbacks, and approximate costs.

  • Stone – There are many types of stone to choose from. However, keep these things in mind when choosing stone countertops:

    • Porous stones like marble, limestone, and bluestone tend to stain more easily. 

    • Choose lighter colors. Darker stone absorbs heat and could be a hazard in high temperatures.

    • Granite ($50-100/sq.ft) and soapstone ($70-120/sq. ft.) are good options because they both hold up well against weather and regular use.

     
  • Concrete – This material is trending right now because of its industrial look and the popularity of industrial design. A couple of things to consider when you choose concrete:

    • Have it professionally installed. It’s particularly prone to cracking if not installed properly.

    • Concrete ($100/sq. ft.) must be sealed when it’s installed and resealed regularly.

    • There are virtually unlimited colors to choose from.

     
  • Tile – The options are endless with tile. Stone and patterned tiles are very popular options because of their affordability and ease of installation. If you decide to go this route, make sure that you take these things into consideration:

    • If you live in a climate with low temperatures, the tiles ($10-30/sq. ft.) have a greater risk of cracking during the freeze-thaw cycle.

    • Tile grout tends to stain even when sealed.

    • Both of the above can be avoided if you purchase freeze-proof tiles and dark-colored grout.

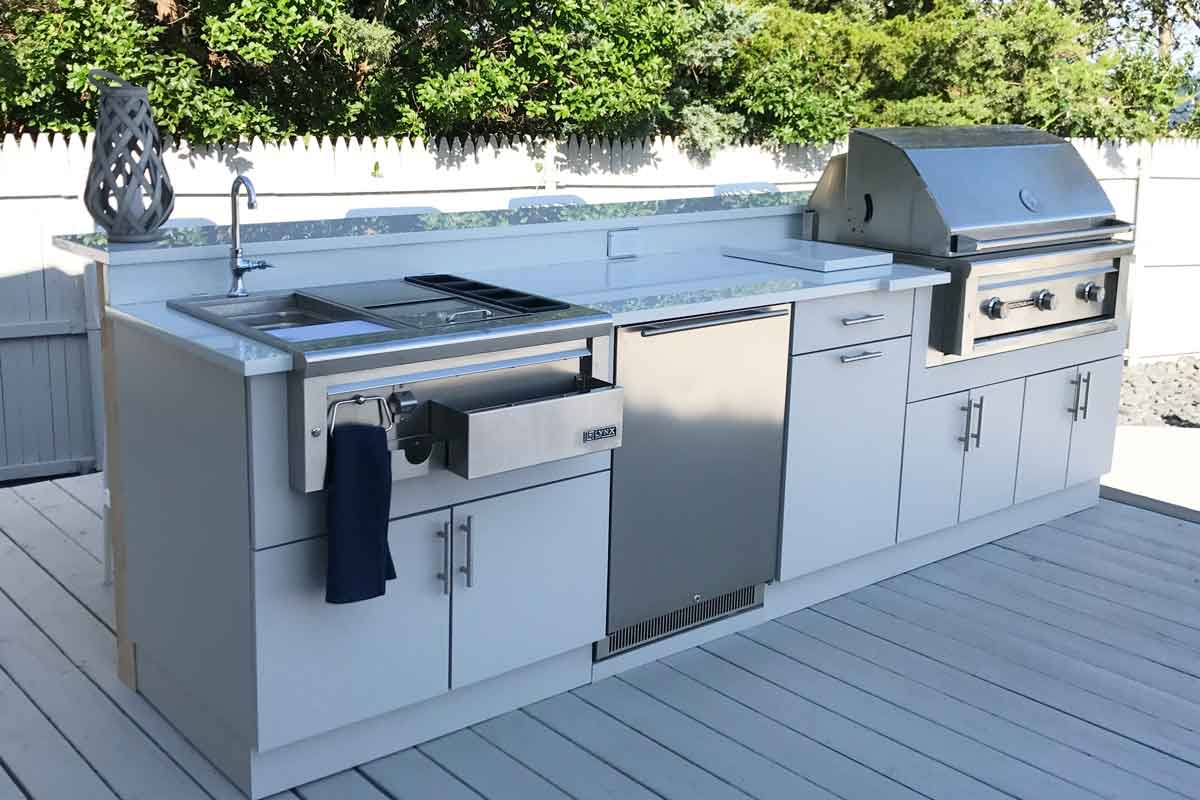
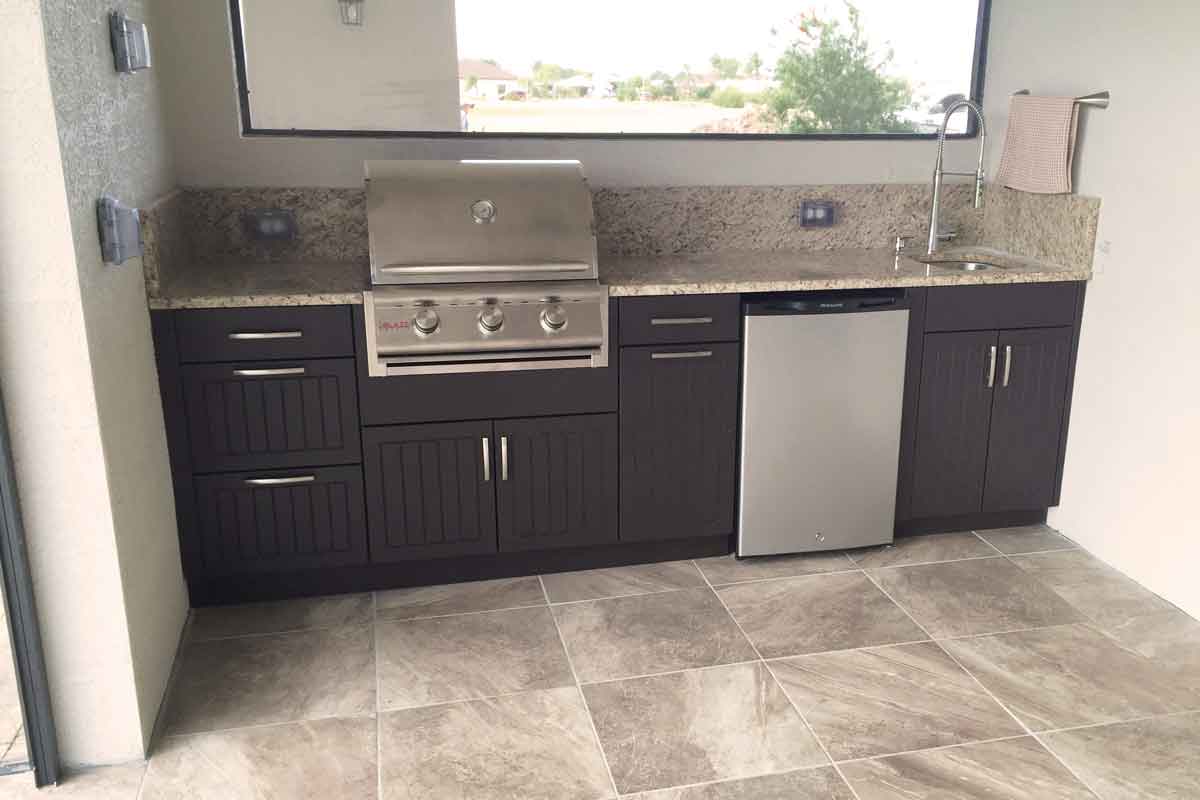
Once you’ve made your decision, we’ll need to know the thickness of your countertop, particularly if your cabinets will be holding appliances. Most customers choose a width of 3 cm.

Appliances

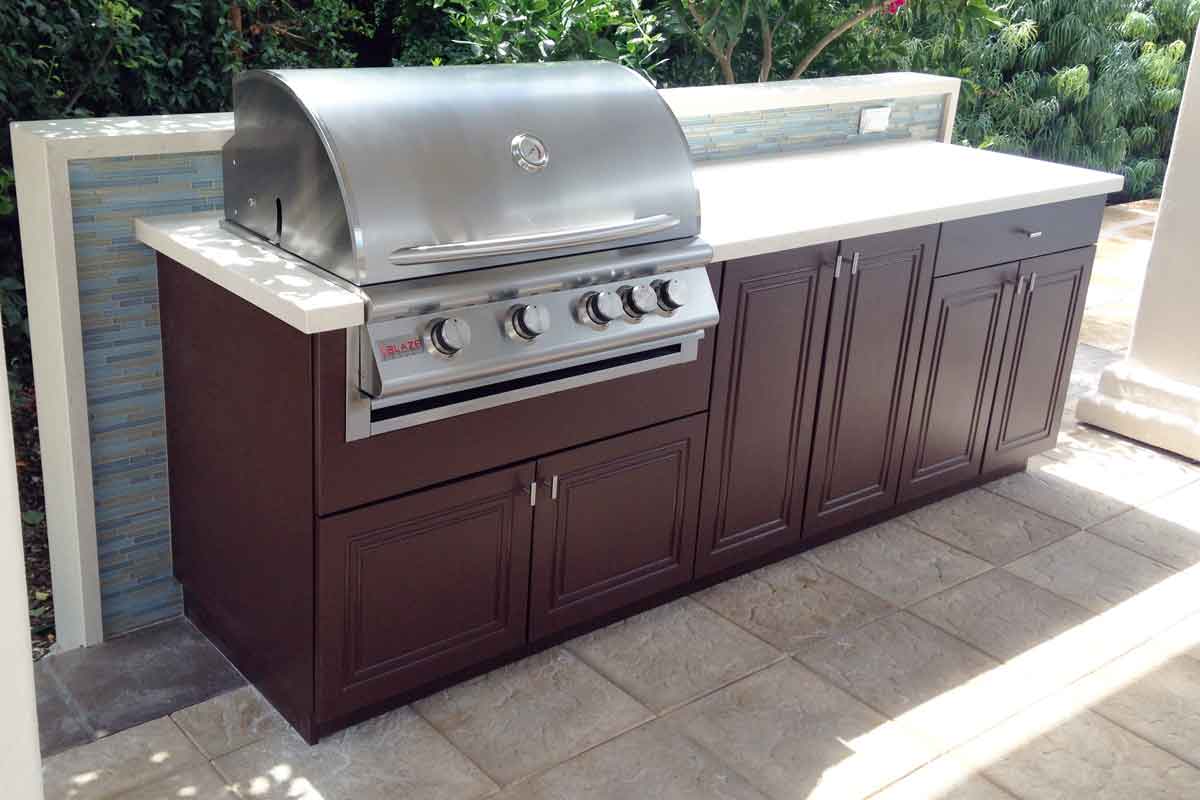
The first appliance that people think of when they consider an outdoor kitchen, is the grill. Our advice is to consider whether a gas or kamado grill will suit your cooking needs best. Although charcoal grills hold their own in the grilling world, they aren’t as practical for outdoor cabinet application.  Once you’ve decided, don’t rush into purchasing the least expensive grill you can find

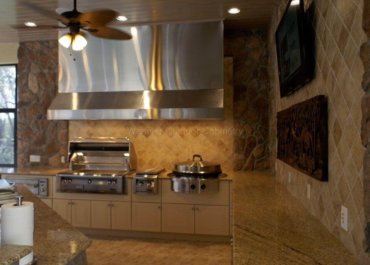
Grills don’t typically come in a standard size, and chances are, you’ll need to replace it sooner than later if it’s not of good quality. If you have your cabinets cut a certain size to fit the cheaper grill and you need to replace it, you might end up having to recut your cabinets. So do your research before you make a final decision. Here are some of the differences and things to take into account when deciding between gas and kamado grills:

  • Gas grills

    • Stainless steel holds up the best against all elements.

    • Gas grills are measured by square inches of cooking surface, so think about how many people you plan to cook for regularly. 

    • Buy grill accessories according to your needs. Things like side burners, infrared searing stations, rotisseries, dual-fuel functionality, and smoking compartments all add to the overall cost of a gas grill.

 
  • Kamado grills

    • Ceramic is best, but it also comes in stainless steel.

    • Buy one that will suit the number of people you plan to feed regularly

    • Rust resistant finish is best.

    • Look into accessories that will give you more workspace as well as grilling options since it features a single temperature environment.

A few other popular appliances for outdoor kitchens to research are ovens (gas/electric or wood fired pizza oven), side burners (either built in or portable plug-in induction burner), vent hoods, dishwashers, refrigerators, and outdoor sinks. 

Lighting

Another important factor for year-round use of your outdoor kitchen, is lighting. In the later part of the year, when the sun goes down earlier, it’s important that you have proper lighting for safe cooking. Where to place lighting will depend on how your kitchen is set up, but below are some tips on setting the lighting for your outdoor space:

  • Above the grill

  • Underneath the edges of countertops

  • Below cabinets that sit up high

  • Ceiling fans with lighting over dining areas

Planning your countertop, appliance, and fixture installation

Since you have a few weeks between ordering and delivery, you can use this time to plan and schedule pre-installations. Coordinate pre-wiring, pre-plumbing, or hood ventilation if applicable. You’ll want to work with local providers to put plumbing stubs in place, run conduit, or place any other mechanical items that need to be installed before your cabinets. 

  • Countertop installation

    • Werever outdoor kitchen cabinets are cut to very tight tolerances, within 1/1000th of an inch (if the drawing says something will be 48.5 inches for instance, it will be exactly 48.500 inches). 

    • Consider and inspect your walls for irregularities (walls, especially if they’re framed with 2×4’s generally have slight imperfections that aren’t obvious to the naked eye). 

    • Your countertop company will want to template your actual cabinet installation, accounting for irregularities in the walls or any modifications done in the field that differ from the project design.

    • Since countertop materials are so expensive and precise, they’ll want to get it right the first time and be sure it fits!

  • Appliance installation

    • We recommend ordering your appliances from us 

      • While we certainly appreciate your business, the most important reason to source your appliances from Werever is that we guarantee the appliances we provide will fit in the cabinets.

      • It is not unheard of for an appliance manufacturer to have errors in their specifications. 

      • If Werever builds outdoor kitchen cabinets based on an incorrect specification, that will be the customer’s responsibility to pay for any costs to modify or replace the cabinets.  

    • Set your appliances – If you ordered your appliances from Werever, they’ll arrive with your cabinet order.

    • Generally, appliances slide into spaces in the cabinets/countertops without any special carpentry or support. 

    • Grill cabinets are built to fit the grill, including the necessary supporting structure. 

      • NOTE: Not all outdoor cabinet manufacturers do this.  Some competitors sell what is basically an empty shell for a grill cabinet. It can be a difficult task to build the proper supporting elements for the grill. With Werever’s cabinets, they’re all part of the cabinet you paid for.

 
  • Sink installation

    • If you have a sink in your project, it is generally sourced from the countertop provider. (you can also order your own sink from any source you like and coordinate the fabrication with the countertop fabricator).

    • You can get dimensional specifications from your Werever design to be sure you order a sink that will fit.

    • Or, tell your Werever designer in the beginning stages of the project what kind of a sink you like and we’ll be sure to make a cabinet that fits the sink you have picked.

We build all of our cabinetry custom, made-to-order. From the time you order until you receive your cabinets is typically 2-3 weeks. Seasonal demand can vary, but your Werever designer will work with you on an acceptable shipping date. If you are coordinating a specific schedule with installers, or your builder, let us know when you order. We can certainly make sure the cabinets arrive when it’s convenient for you.

The best part of planning your outdoor kitchen, is that even though we help you put the pieces together, you envisioned it all. The cabinets, countertops, appliances and accessories, lighting, and fixtures were all your ideas. At the end of this project, we know you’ll be proud to entertain your family and friends in a space you created.

How to Buy

How Much do Werever Outdoor Cabinets cost?

See examples of REAL outdoor cabinet projects with cabinet prices. Prices reflect outdoor cabinets only.

Custom Outdoor Cabinets

Made in the U.S.A.

Werever specializes in custom outdoor cabinets.  We build the strongest and most precise-fitting outdoor cabinets in the industry. Werever outdoor cabinets has been in business since 2001 with the best warranty in the industry. Werever Outdoor Cabinets are proudly MADE IN THE USA.

You’ll find our weatherproof cabinets in backyards across the country, in ocean-front high-rises, in resorts, even in parks and zoos! Wherever beautiful cabinets are needed that can resist the worst environmental conditions, a Werever Cabinet is a perfect fit!