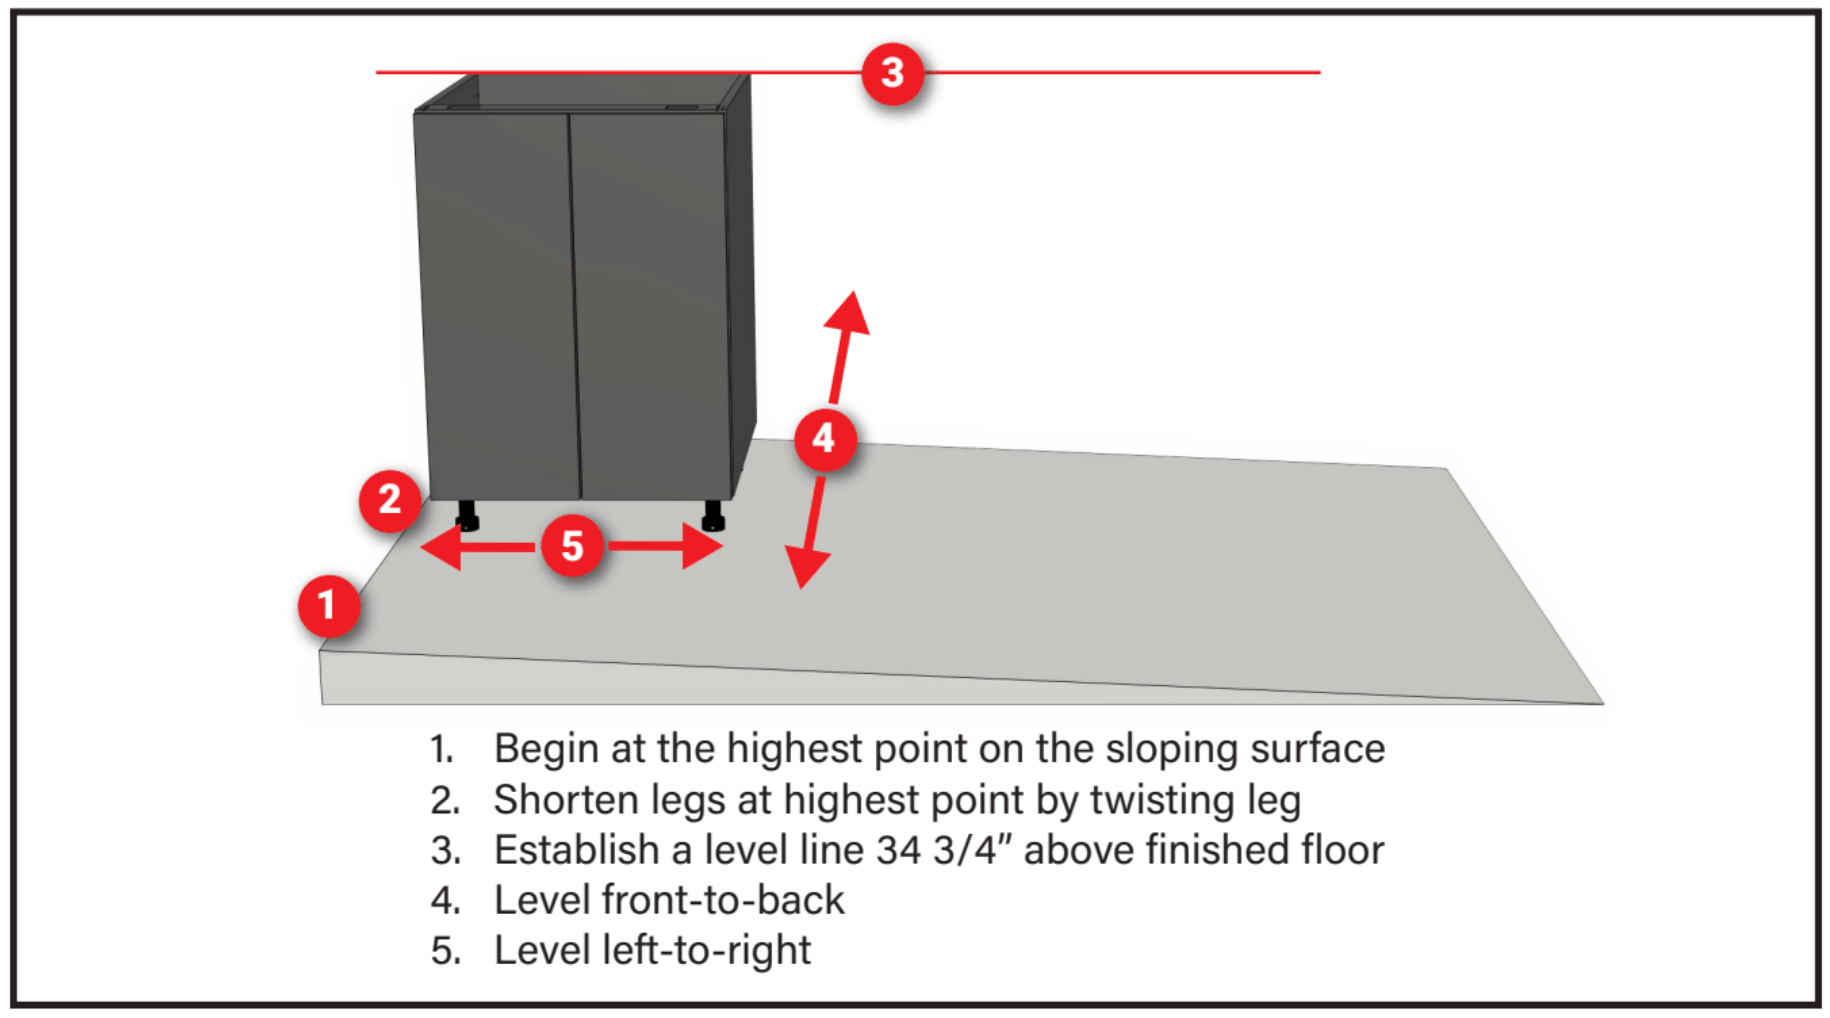
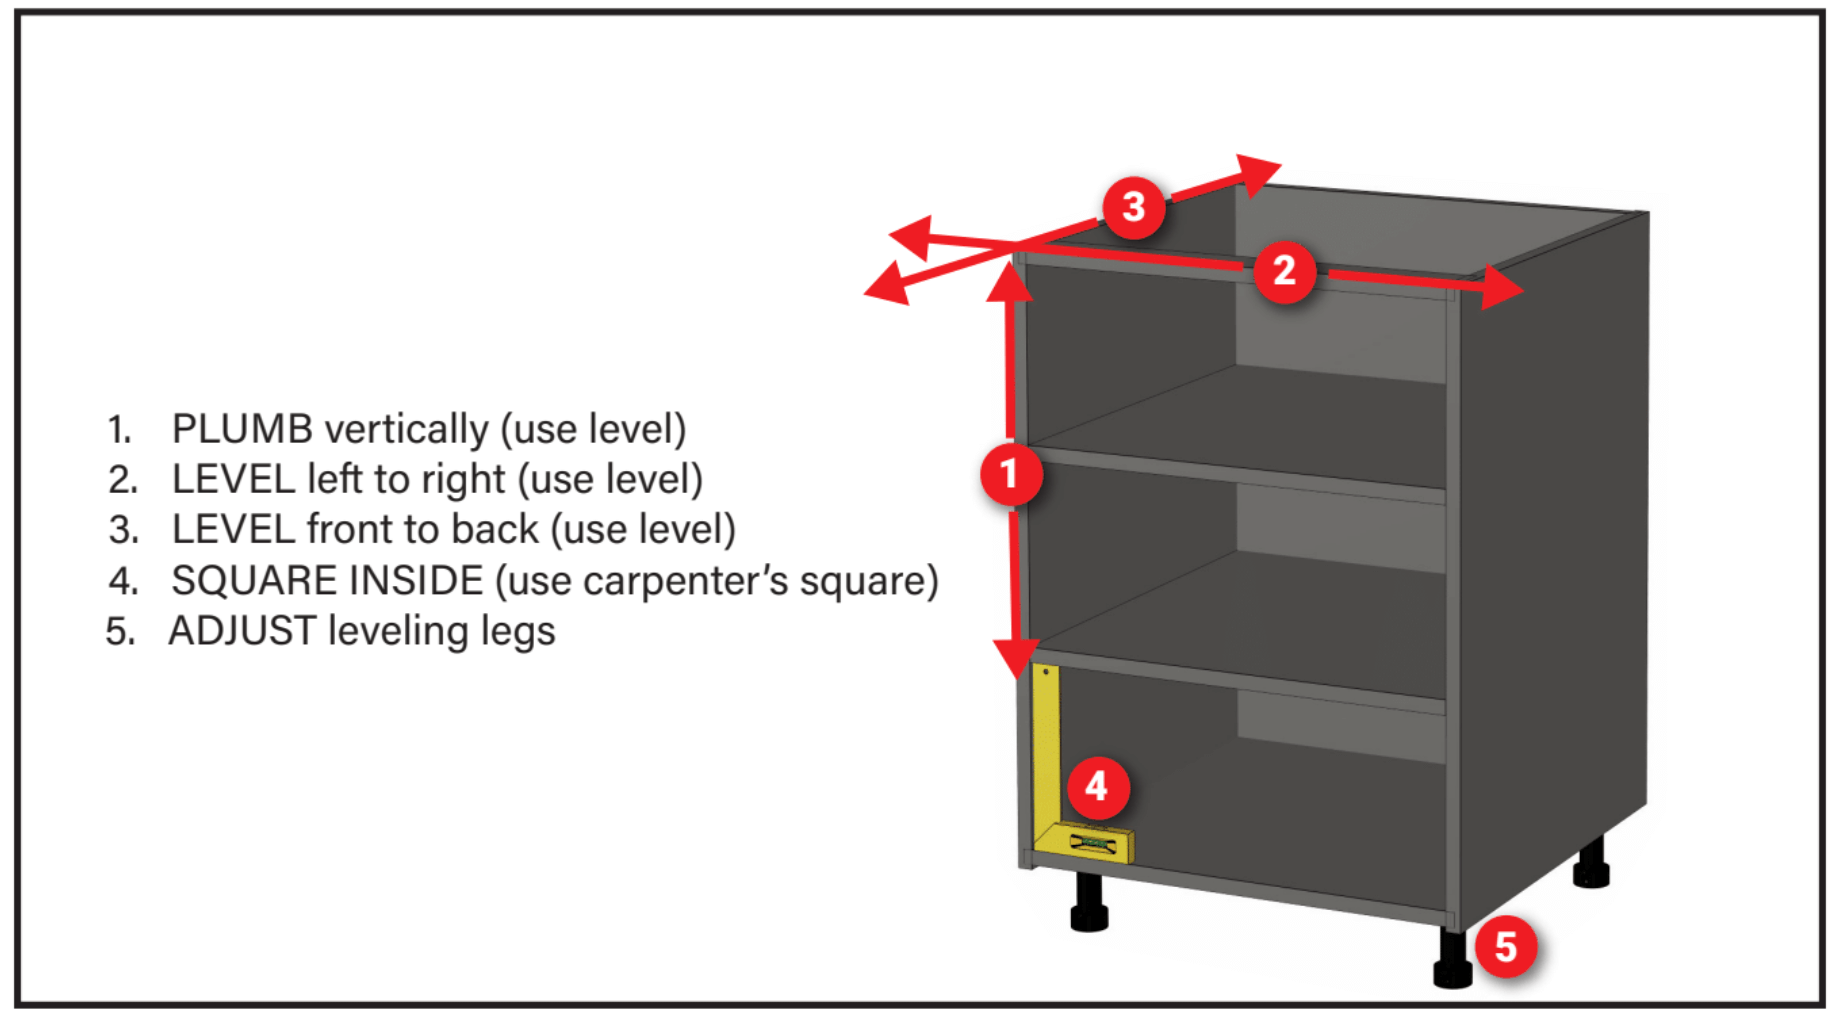
NOTE: Leveling and Squaring the cabinet is the most important part of the installation!
If you do not level and square the cabinets properly, the doors will not align, and drawers may be racked.
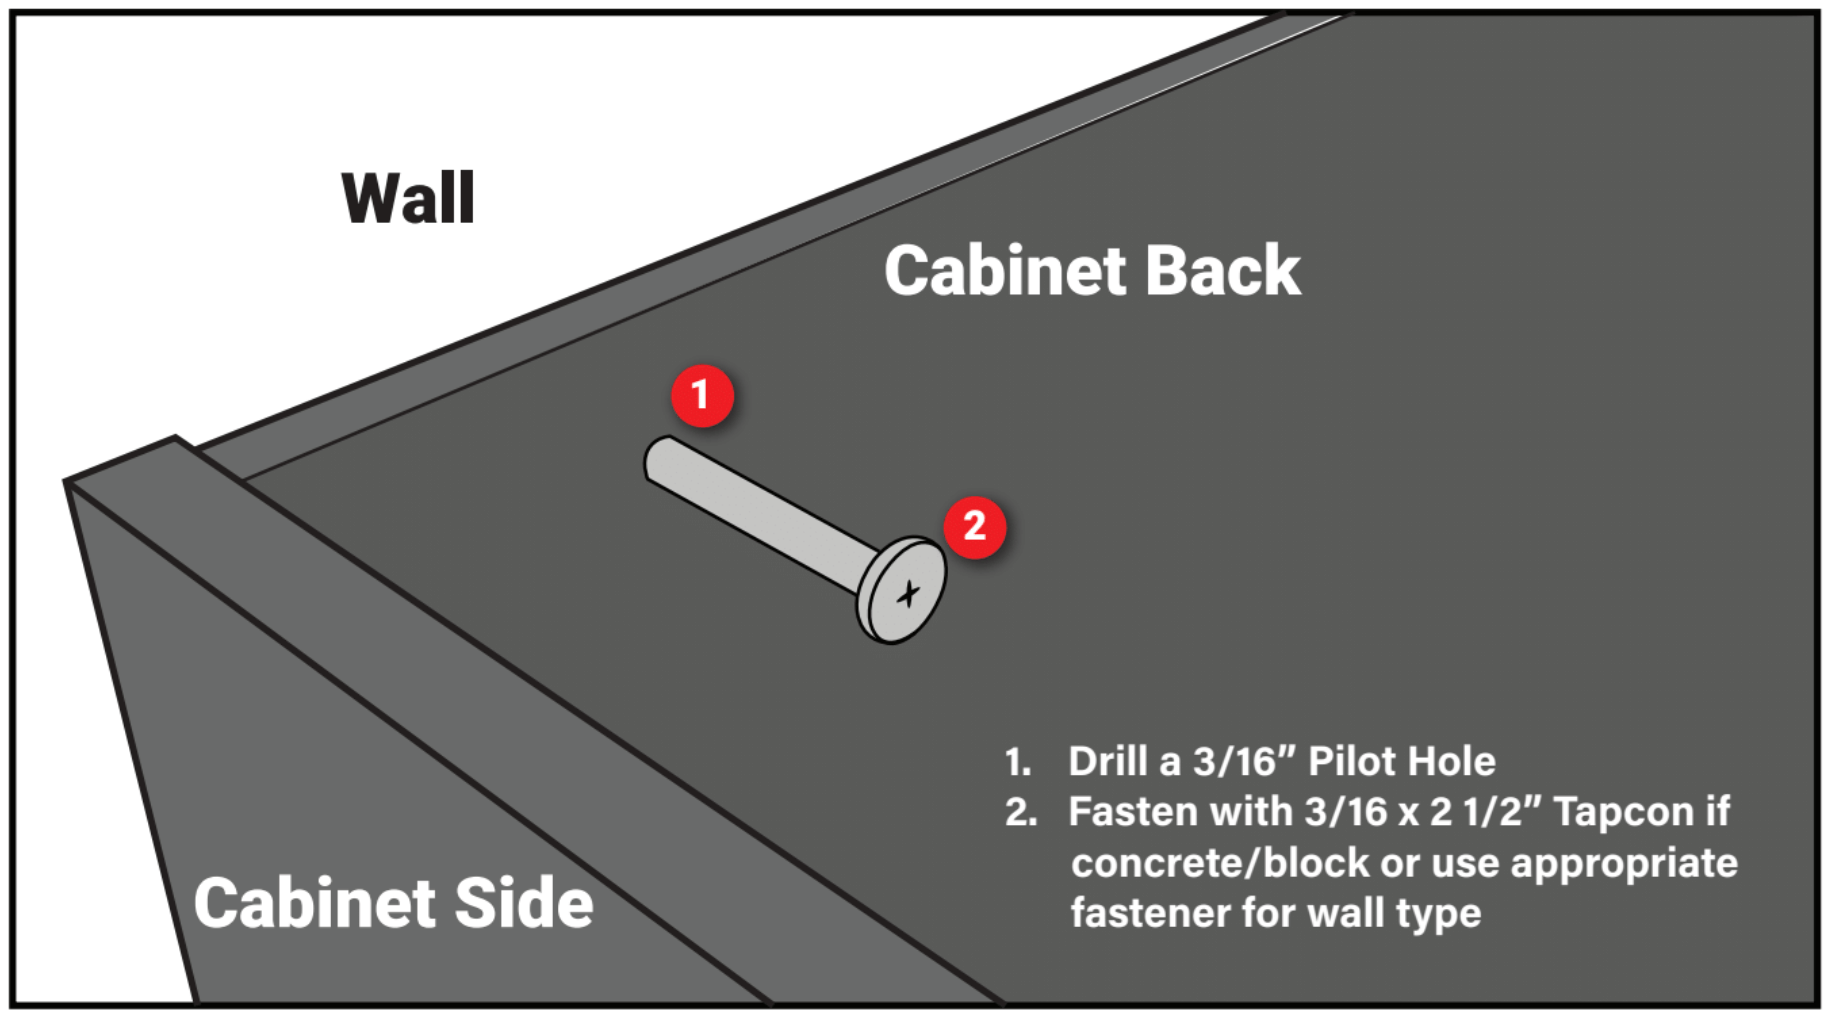
Once leveled, fasten cabinets to walls using common hardware (not provided). For concrete block or stucco walls, stainless steel Tapcon® fasteners are recommended. Two fasteners per cabinet are recommended for base cabinets, and minimum four fasteners are recommended for wall cabinets.
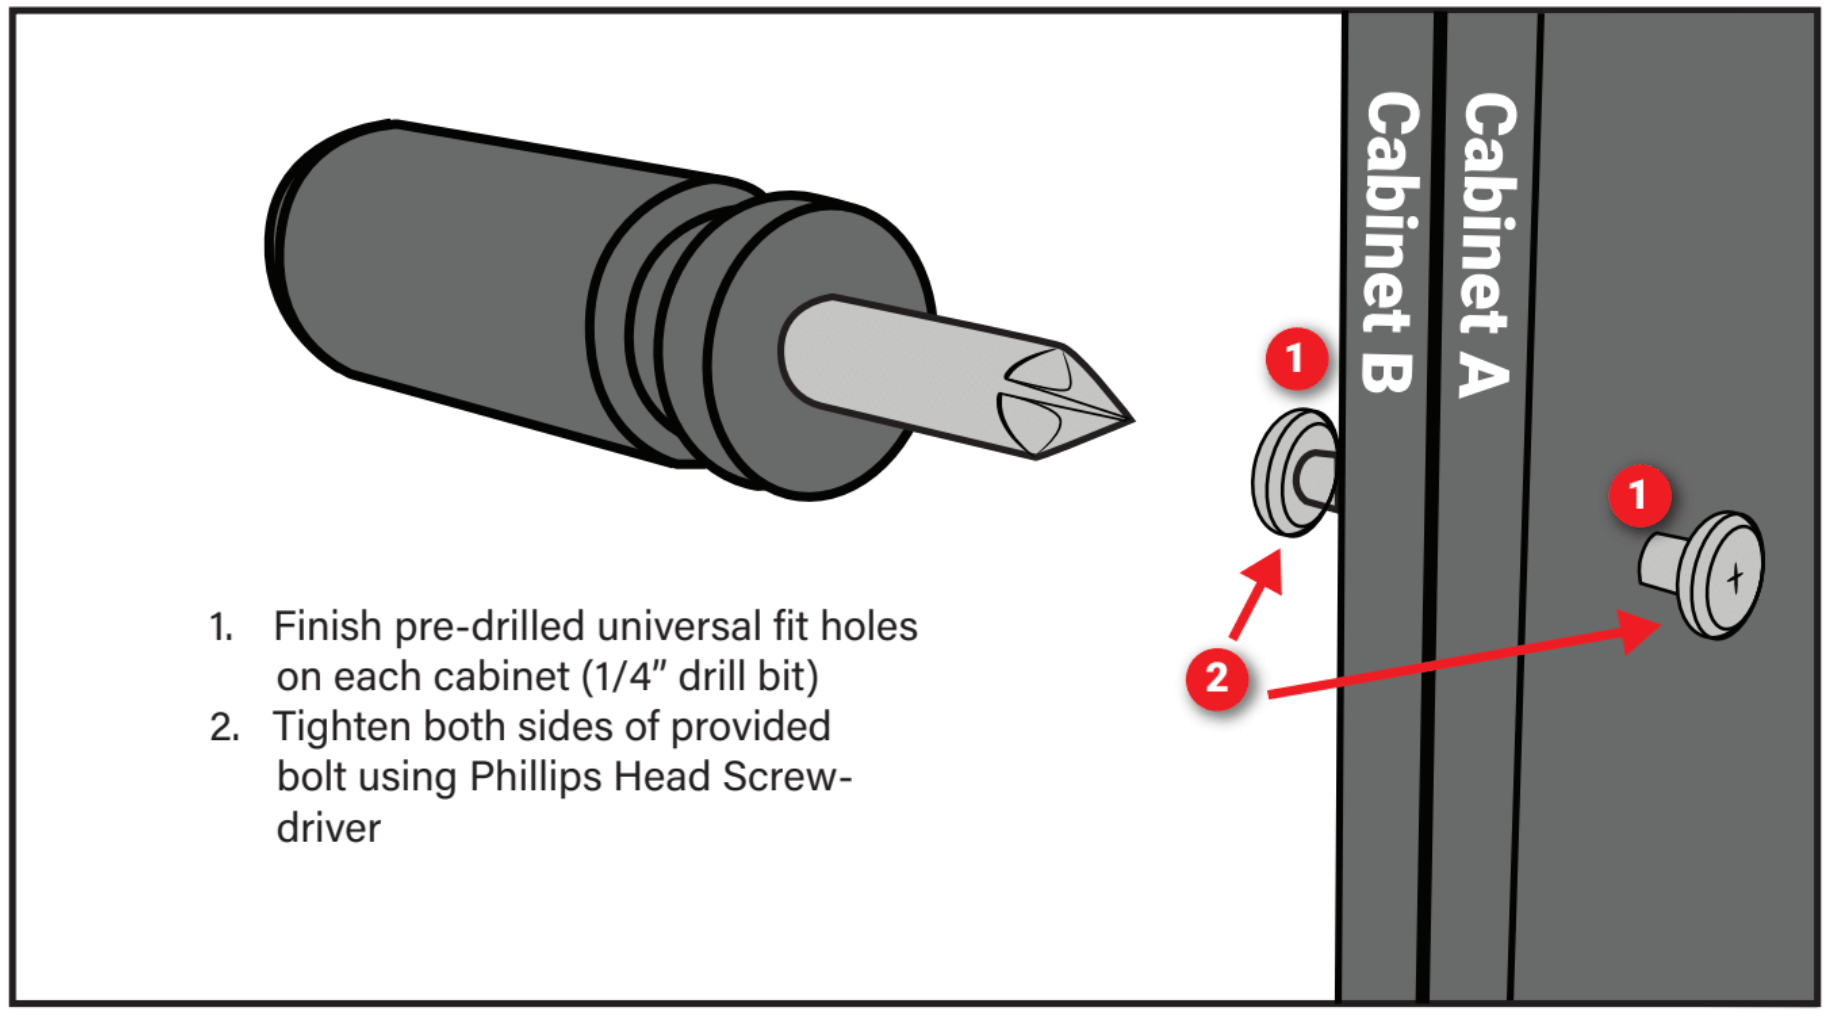
Most cabinets and fillers have partially pre-drilled “universal fit” holes that are perfectly aligned for a precision fit. Finish drilling the holes of two adjoining cabinets using a ¼” drill bit, and then fasten the cabinets together using the provided hardware.
- Use clamps to hold the cabinets in place when drilling and attaching hardware.
- If the pre-drilled holes don’t line up, that is a red flag that your cabinets are not level.
- For some parts, pre-drilled holes do not exist. You will have to drill your own holes.
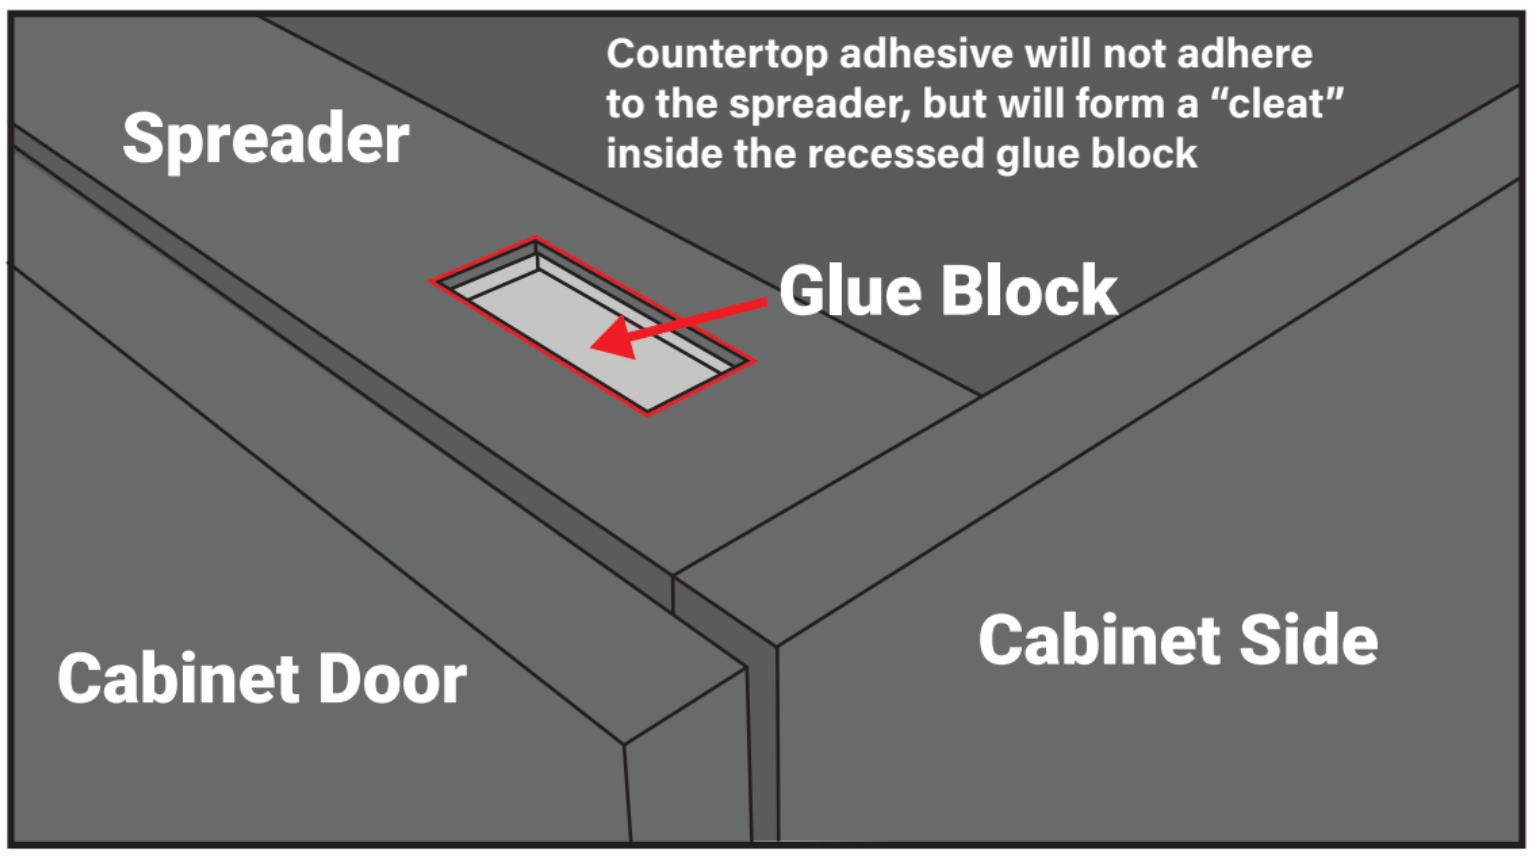
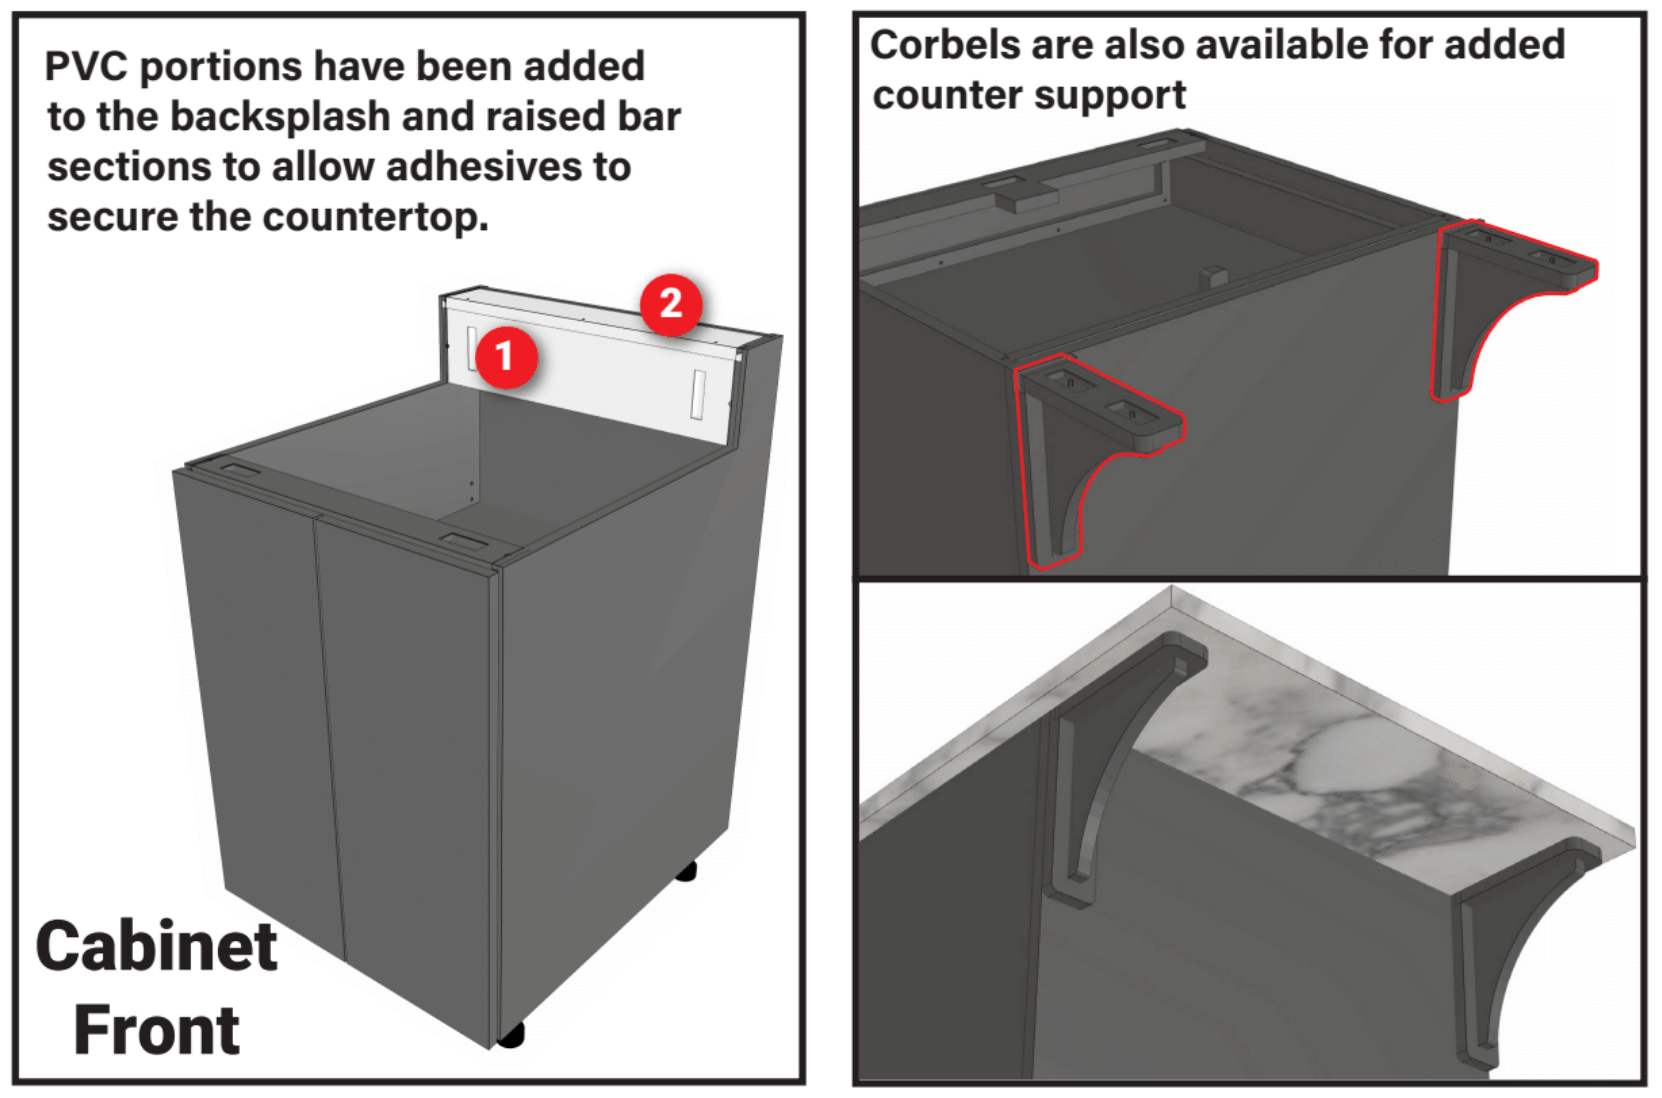
NOTE: Countertop adhesive will create a “cleat” inside the recessed glue block.
Nearly all countertop types can be installed with our cabinets. Professional countertop fabrication is recommended for granite, concrete, quartz (Silestone® or Zodiaq®), or solid-surface acrylic (Corian®) materials. Countertop adhesive will create a “cleat” inside our spreader glue blocks (shown below).
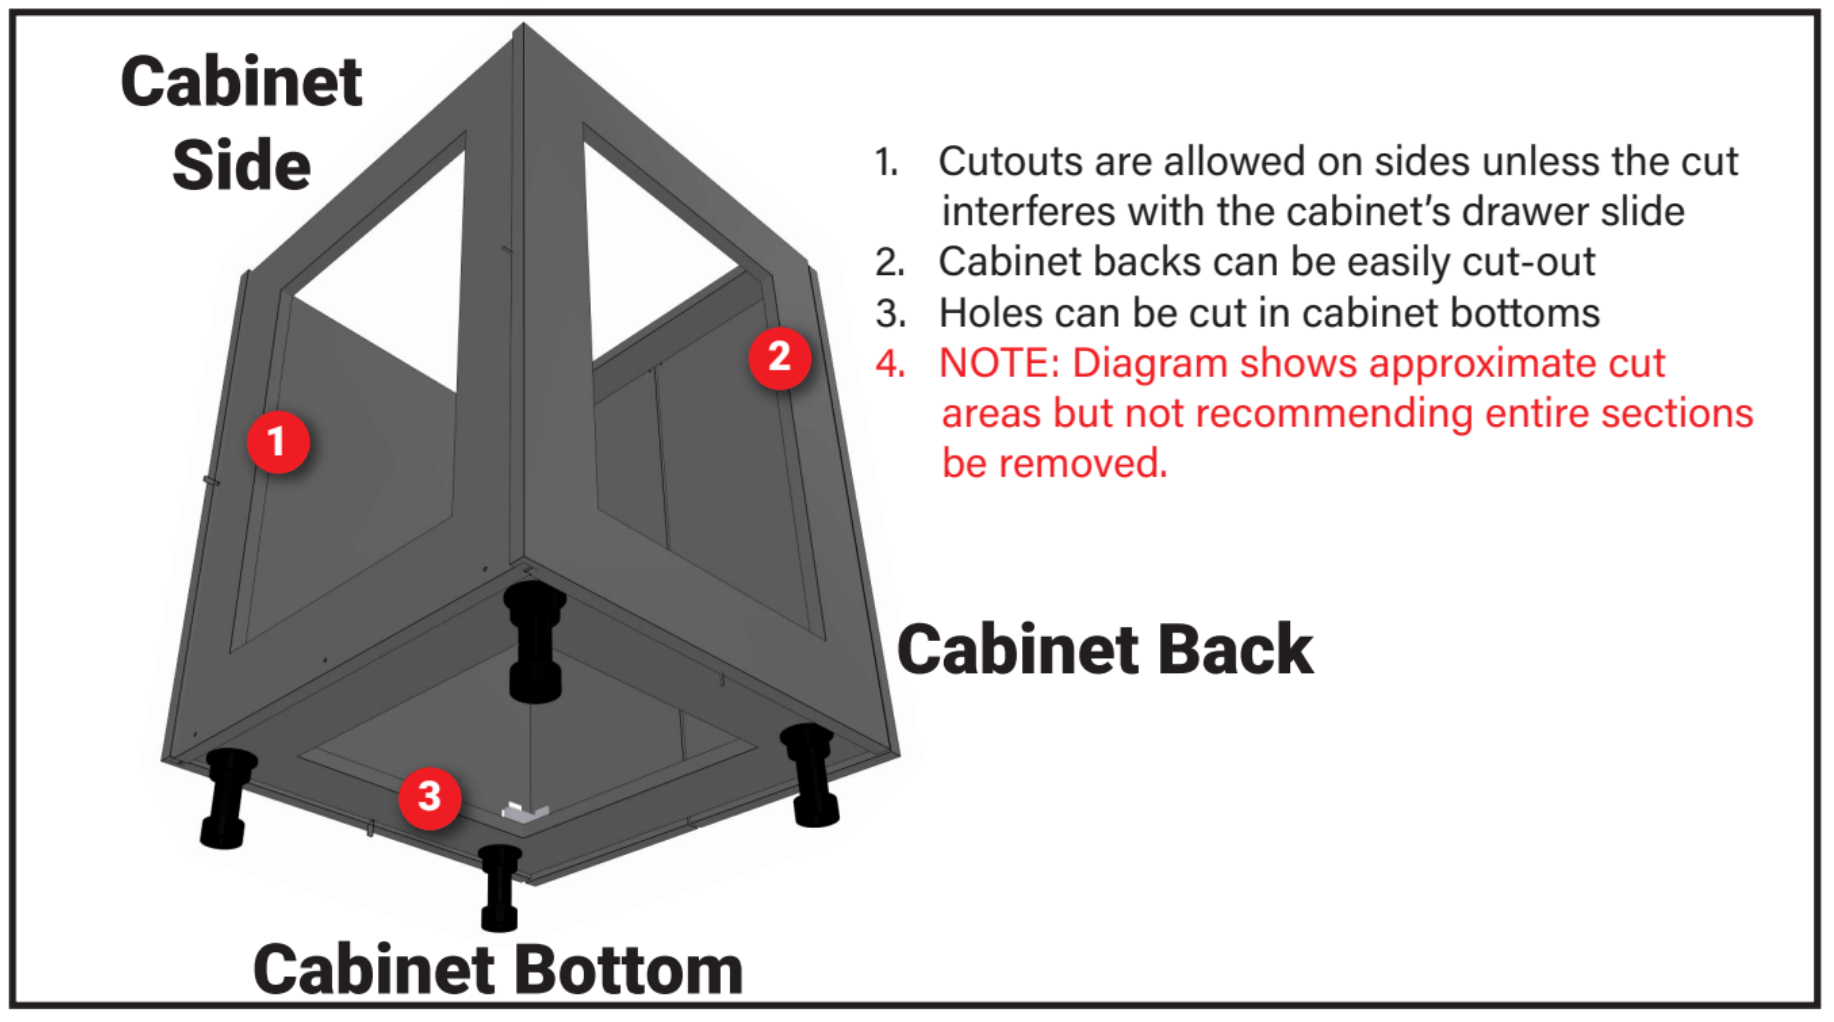
NOTE: Diagram shows approximate cut areas but not recommending entire sections be removed.
Holes can be easily cut in cabinet backs, sides, and bottoms for plumbing, gas lines, or electrical work using ordinary hand tools.
- Cabinet corners and joints should not be cut, as that will alter the structural integrity and strength of the cabinet.
- Morse Hole Saws are not recommended. The polymer shavings (or sawdust) tend to melt inside these bits. We suggest using a Carbide Tipped blade for plastic and plexiglass.
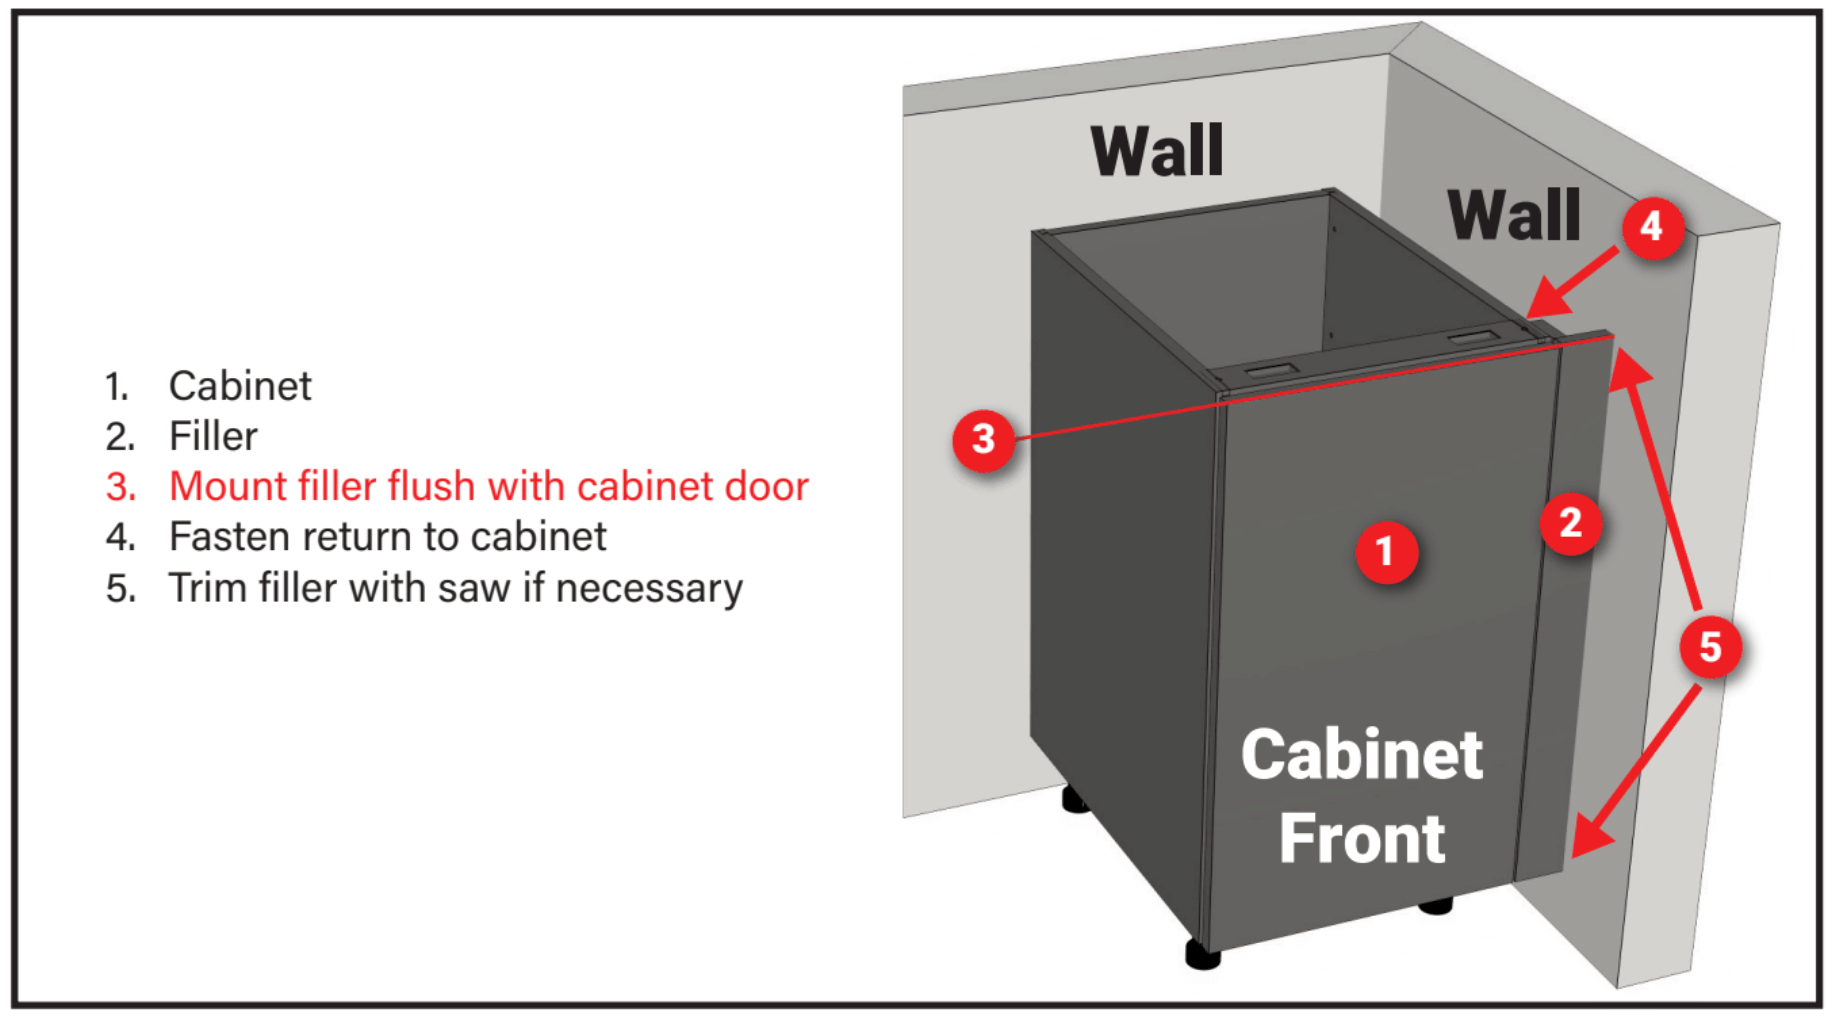
NOTE: Mount fillers flush with the cabinet door.
Depending on your design, some fillers may need trimming to fit.
- The return piece on the filler connects to the cabinet. Stainless steel bolts have been provided for this purpose. Fillers will have the same pre-drilled pattern on the return piece that cabinets have onthe panel.
- Mount the Filler so that the face is flush with the adjacent cabinet’s door face.
- Fillers can be trimmed with a table saw or circular saw if necessary. You can cut the filler with an ordinary woodworking saw.
NOTE: Always pre-drill holes for screws with a 1/8 inch bit
Find the hardware labeled “Finished Back Hardware”.
This set contains:
This will relieve pressure around the screw and prevent potential cracking or splitting of panels over time as the material expands and contracts with temperature changes. To maintain the warranty coverage, you must pre-drill all holes.
- Short Screws – 7/8” Flat head screws – For holding the spacers in place.
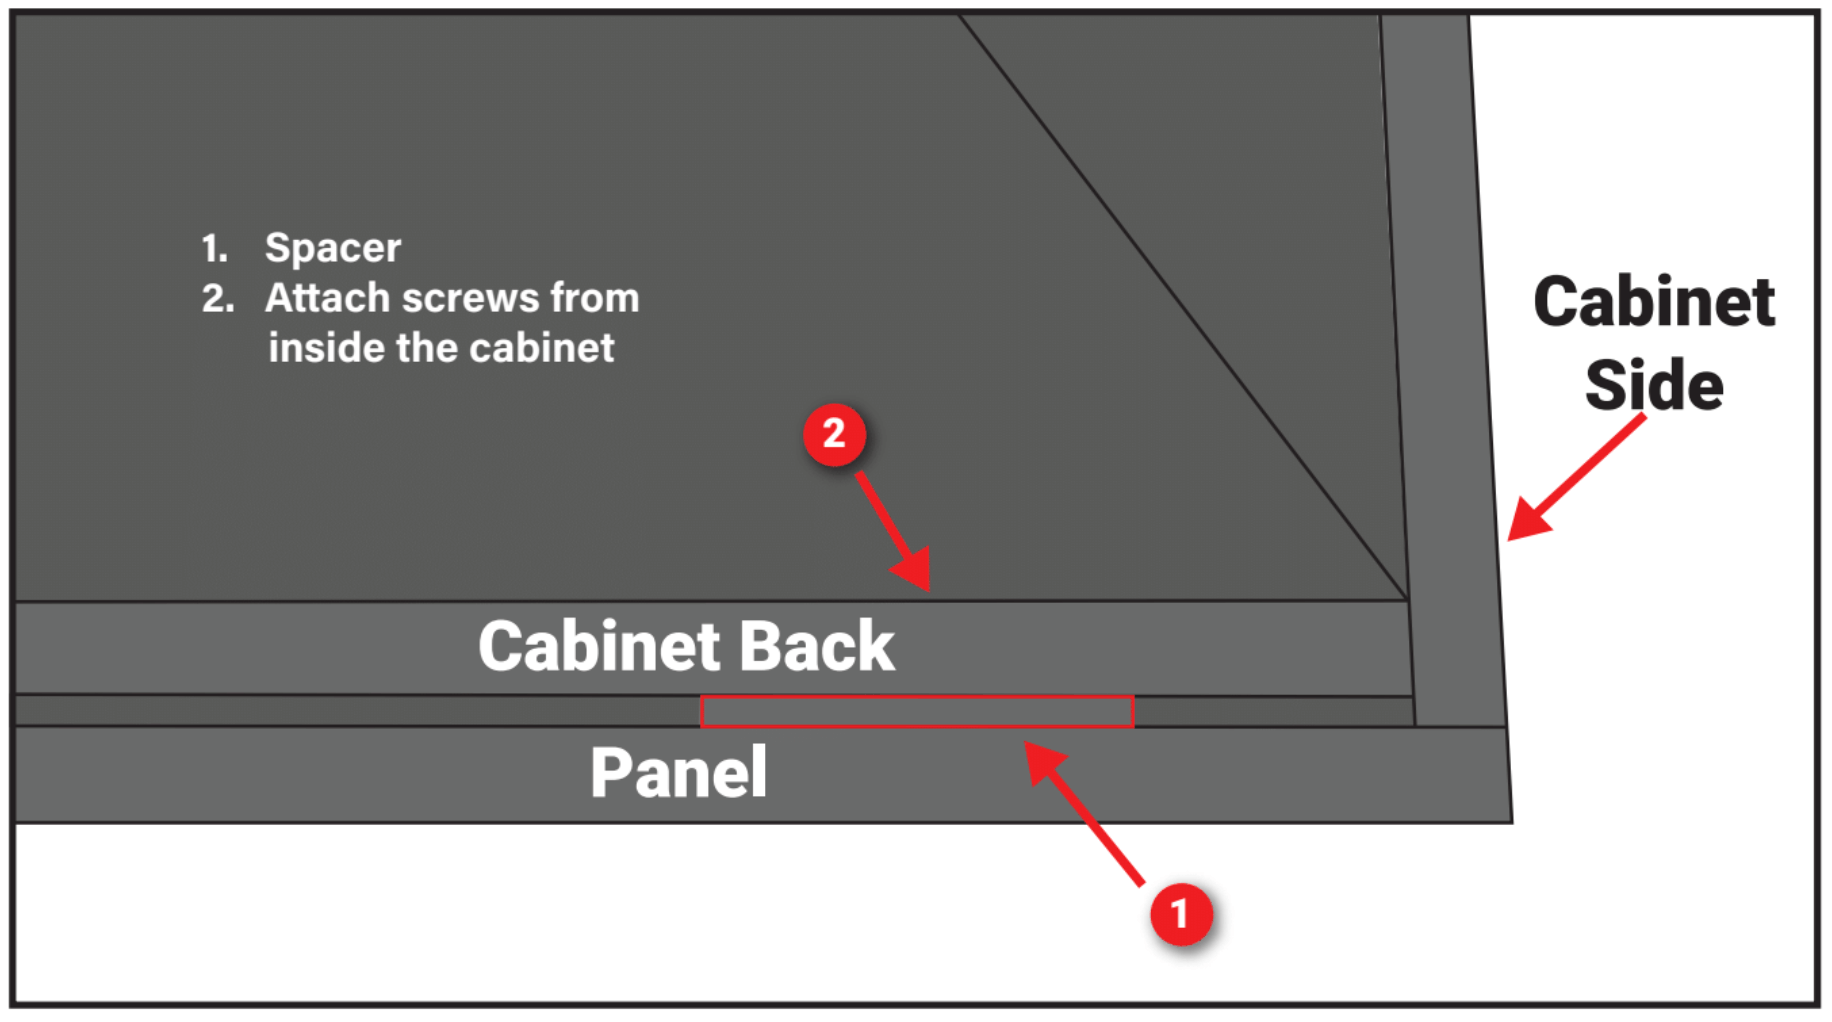
- Long Screws – 1 1/2″ Pan head screws – For holding panels in place. These fasten from the INSIDE of the cabinet. Do not screw into the face of the back panel. It is very important that you use the supplied screws that are the proper depth for securing the panel.
- Quarter-Inch Spacers – These are used to fill the void between the cabinet’s back and the decorative/finished back panel. One side has beveled holes to countersink the short flat headscrews.
NOTE: Always pre-drill holes for screws with a 1/8 inch bit. This will relieve pressure around the screw and prevent potential cracking or splitting of panels over time as the material expands and contracts with temperature changes. To maintain the warranty coverage, you must pre-drill all holes.
- Reference your design layout to help you find the correct panel location
- Attach spacers to the back side of the cabinet by pre-drilling with a 1/8” bit, then fasten using7/8” flat head screws. Face the side with the countersunk holes away from the cabinet. Use two (2)spacers per 18 inches of cabinet width.
IMPORTANT: IF YOUR BACK PANEL HAS AN UPGRADED COVE OR GROOVE DESIGN, PLACE SPACERS WHERE SCREWS WILL NOT POKE THROUGH THE DESIGN.
- Drill one 1/8 inch hole through each spacer
 |
NOTE: Use a drill stop for pre-drilling holes
- Use clamps to hold the panel in place, protecting the finished surface of the panel.
- From the INSIDE of the cabinet (through the clearance holes you just drilled) pre-drill partial 1/8inch holes into the back panel. Do not drill all the way through the panel. Holes should go 1/2 inch into the 3/4 inch back panel.
IMPORTANT: USE A DRILL STOP FOR PRE-DRILLING HOLES IN PANELS. YOU CAN’T PLUG ORFILL A HOLE IN THE HDPE PANEL, SO BE VERY CAREFUL TO NOT DRILL ALL THE WAY THROUGH THE PANEL.
- Use the 1-1/2 inch pan head screws, secure the panel from the inside of the cabinet through the holes you drilled.
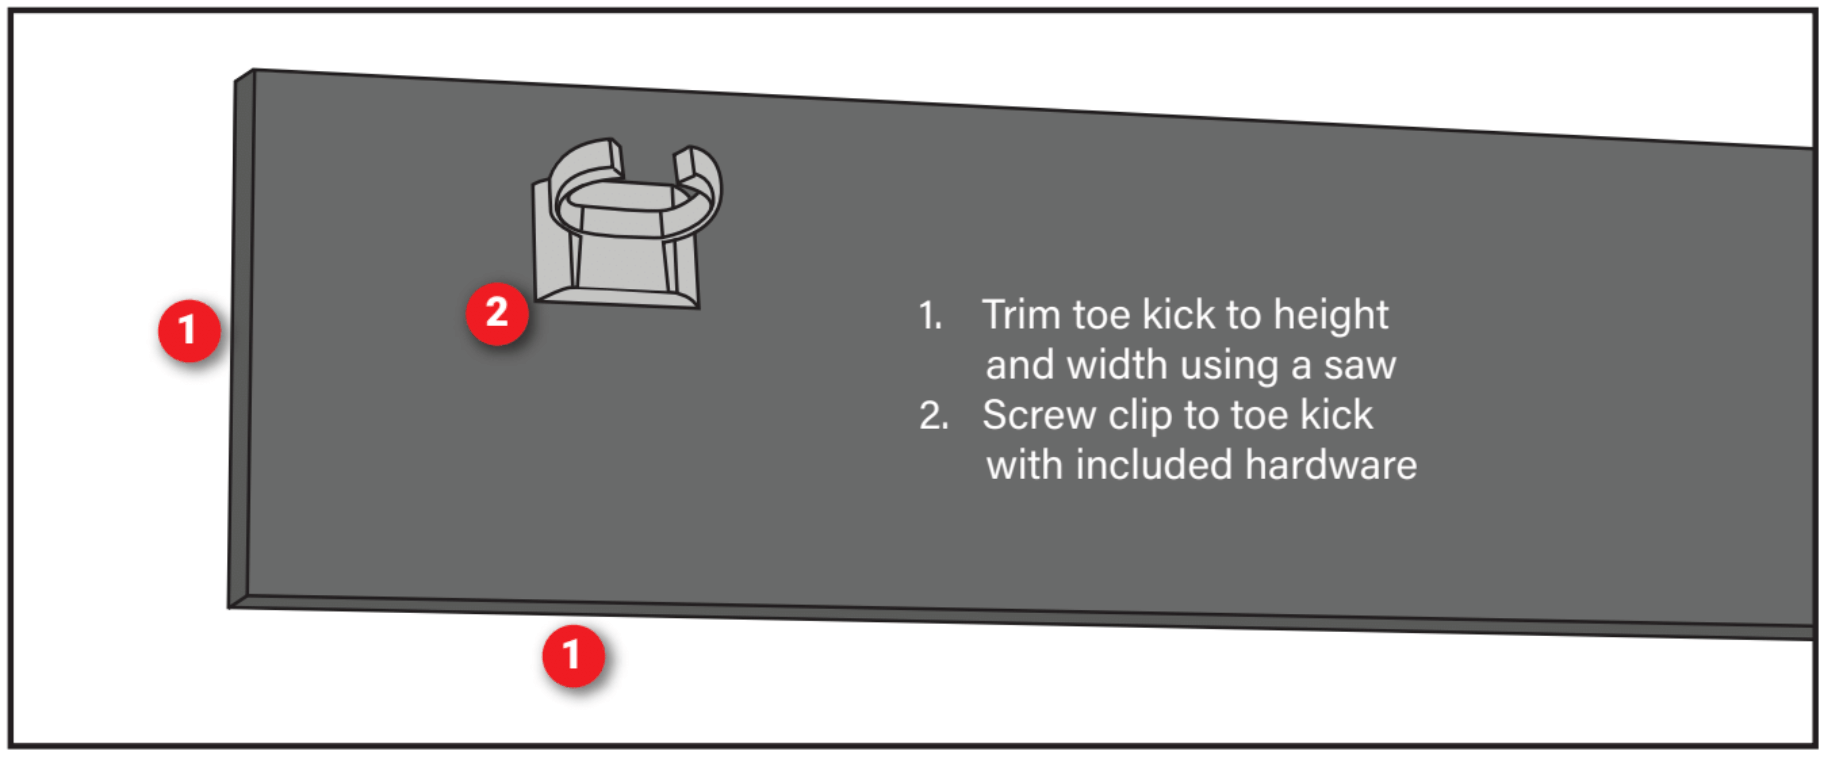
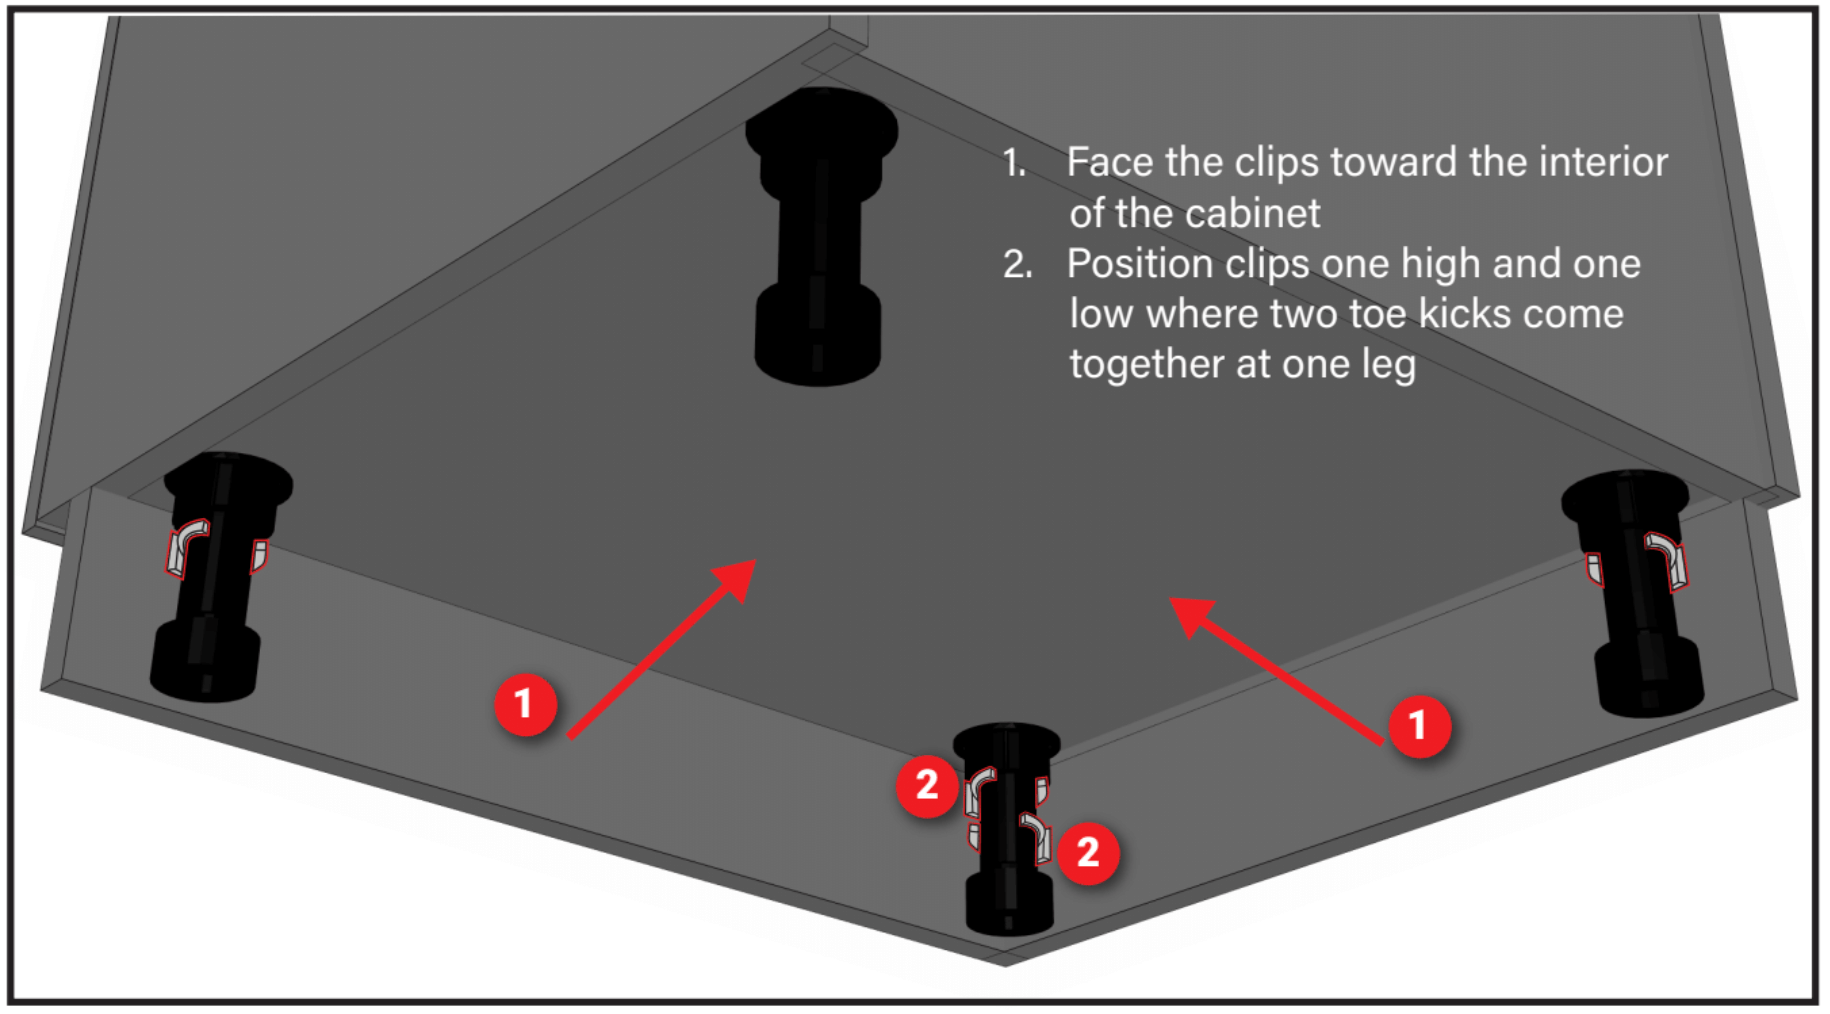
Once your cabinets are installed the toe kick can be added. Attach the clips to the toe kick with the included hardware. Toe kick can be trimmed to fit with a regular wood saw. Adjust the bottom of the kick to the grade of the ground for a finished look.
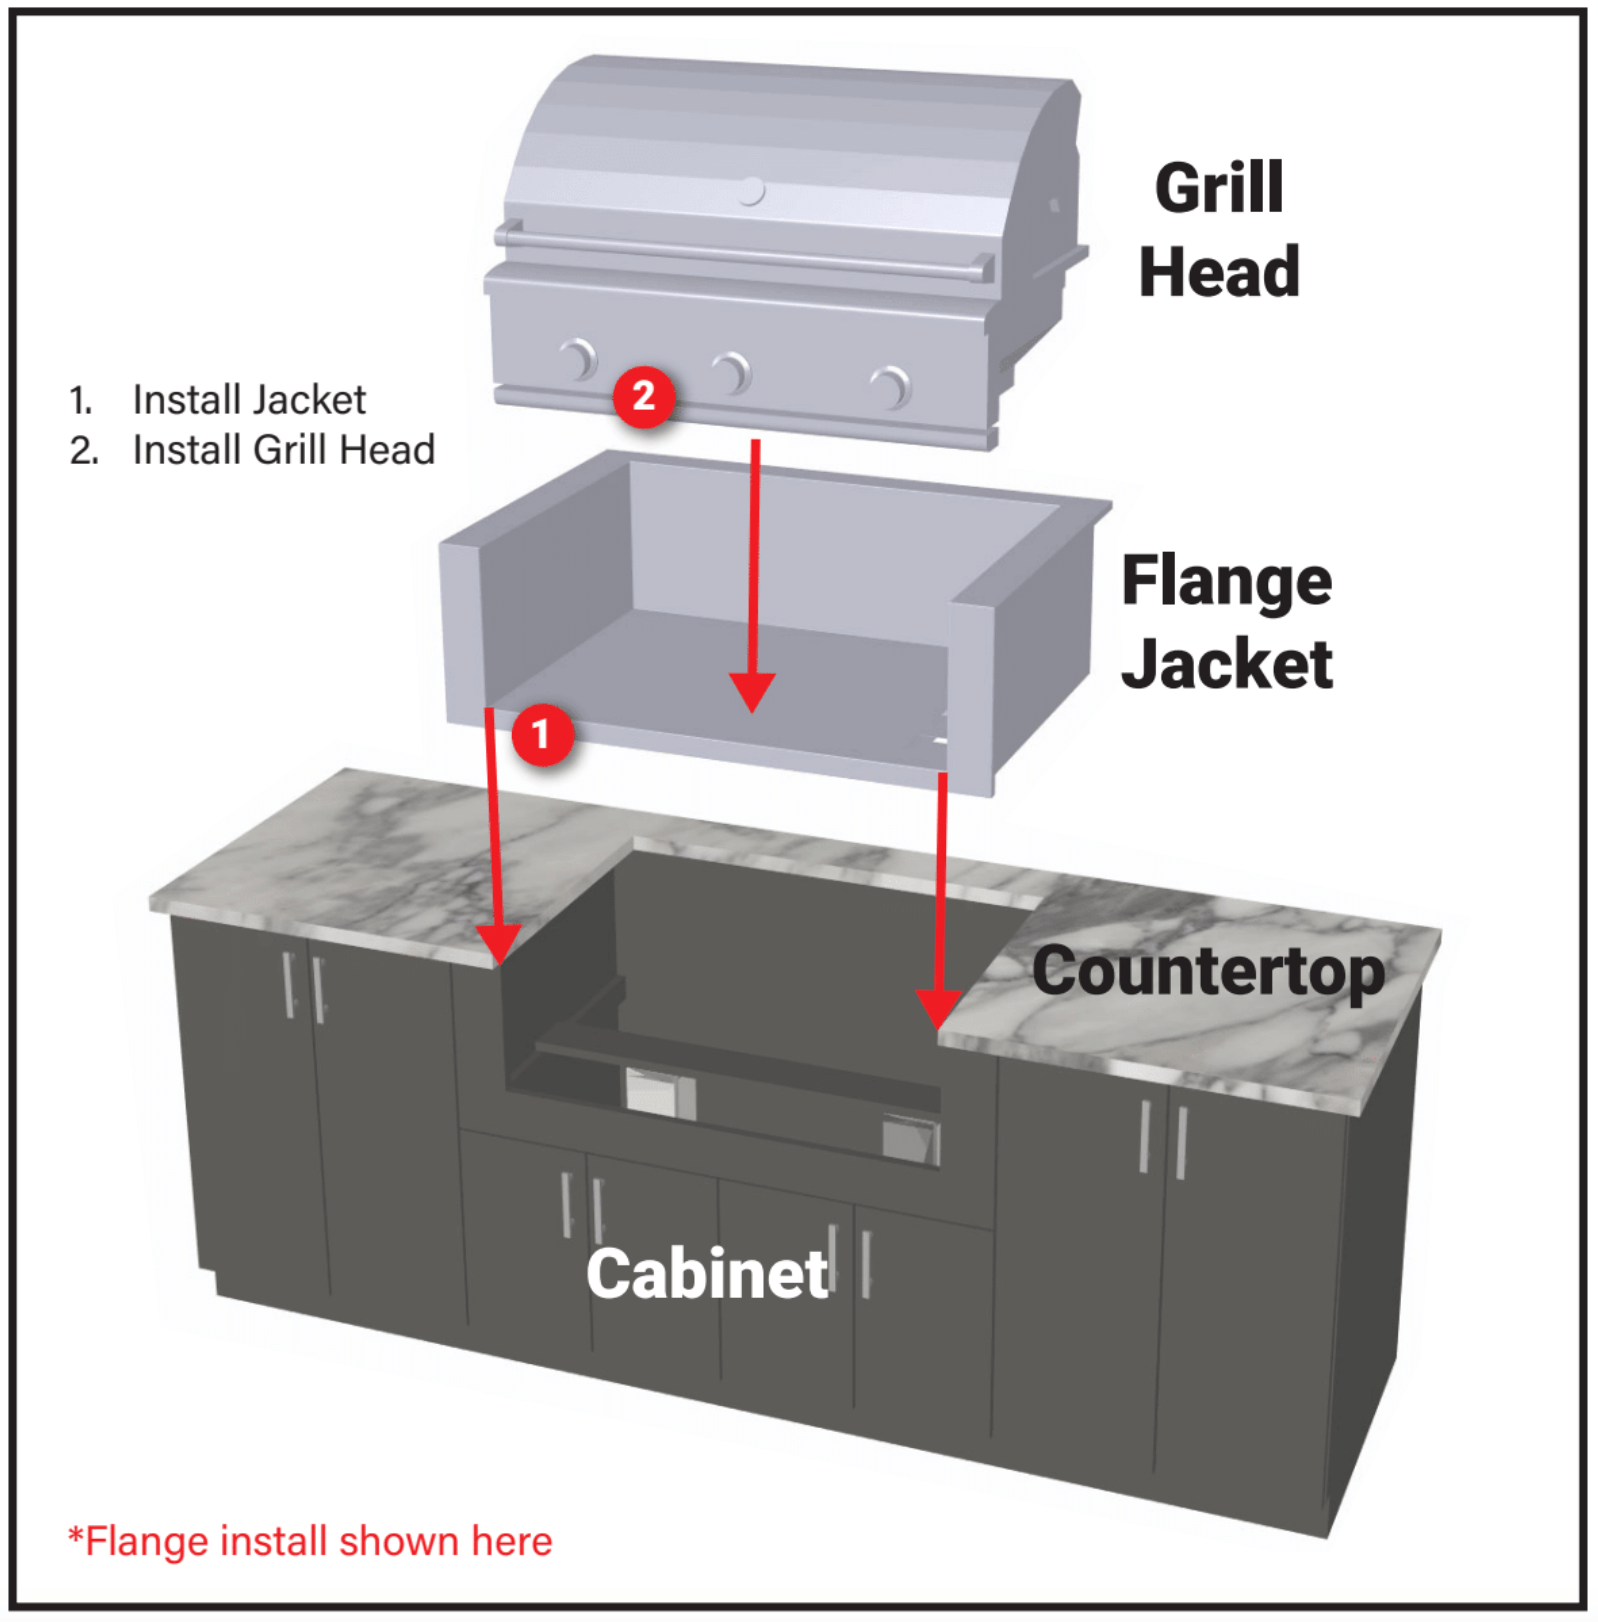
NOTE: Flange install shown below
Grill insulating jackets generally come in two different styles: flange or box
- Flange Jackets are supported by the countertop and hang by a flange
- Box Jackets have square edges, no flange, and are supported from beneath
Countertop supported liners have a stainless steel flange that rests on the countertop. They aredesigned to support the entire grill without any additional support. You may prefer to use the T-barbrace for added support. Box jackets are flangeless liners and are supported by the T-Bar brace andalso rest on the front edge of the grill cabinet.
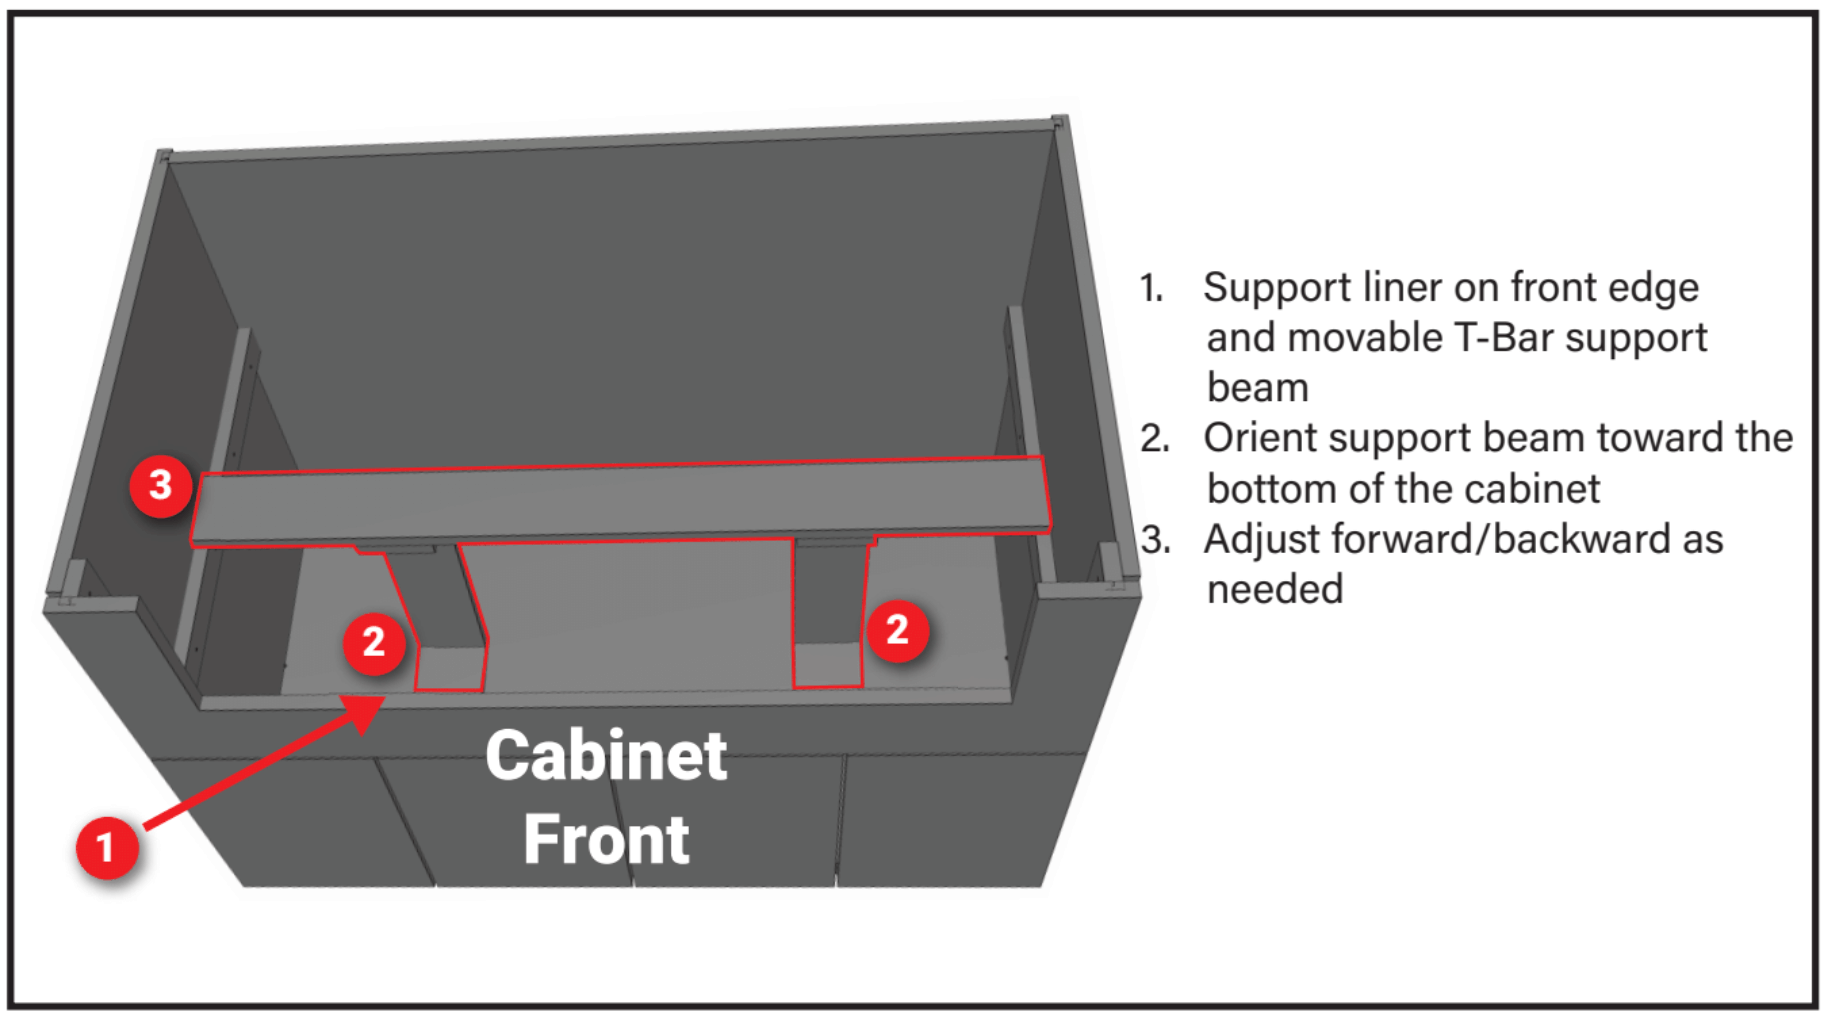
Drop-in style grill cabinets come with a movable “T-Bar” Brace. There is not an industry standard among grill manufacturers for gas or wiring locations. The brace is movable to allow installers to position the brace appropriately, allowing clearance for gas fittings and/or wiring harnesses.
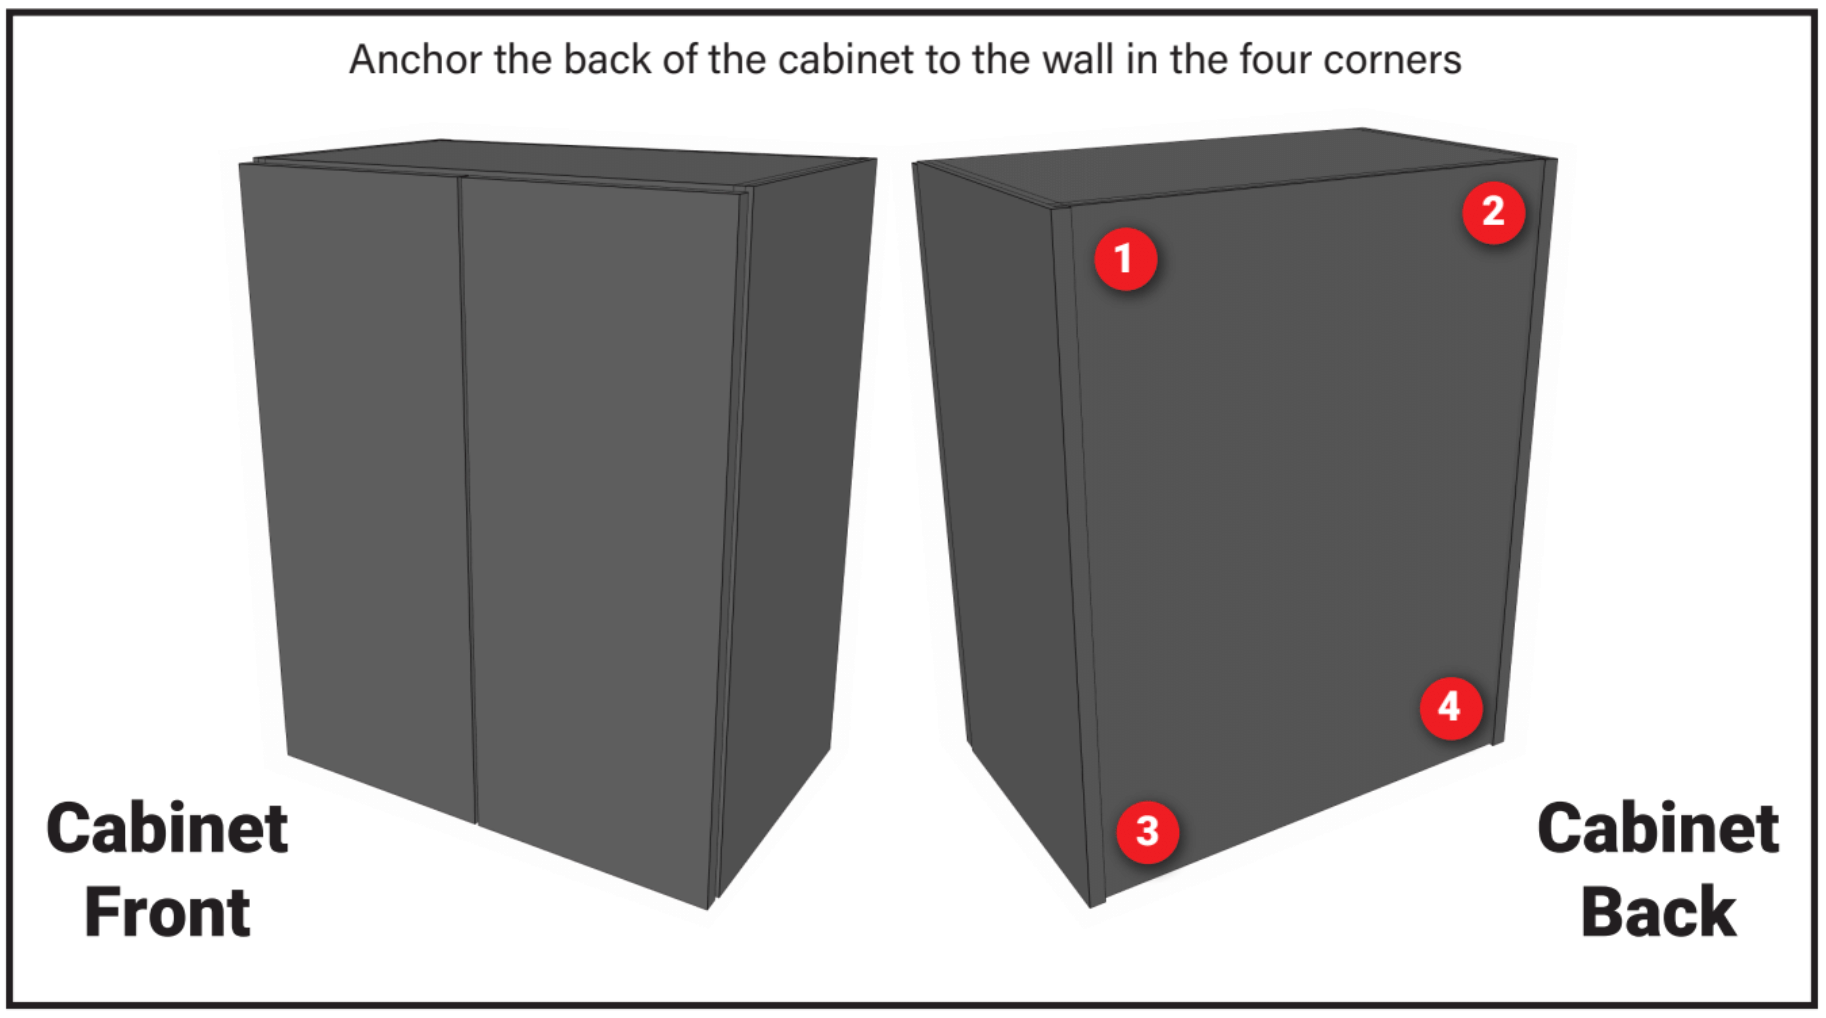
NOTE: A minimum of four (4) wall anchors should be used.
Wall cabinets should be supported by a minimum of four (4) anchors, placed in each corner of the cabinet. It may be appropriate to add more anchors. Werever does not include wall cabinet fastening hardware because the appropriate hardware will vary depending on your wall’s construction. It is very important that you choose an anchor suitable for your wall’s construction and that the anchors fasten to a structural element within the wall. It may be necessary to place shims behind the wall cabinet when anchoring. If your wall has any bow or curve, over-tightening anchors without shims can distort the cabinet shape and cause door alignment problems. The wall cabinet’s “box” should still be plumb, level, and square after installation. Unlike base cabinets that can be adjusted with leveling legs, the wall cabinets rely on proper anchoring with shimming to achieve leveling.